As a designer in QuiltInk, setting up your patterns is a crucial process. It involves four main steps:
- Submit your pattern.
- Set up the color layouts.
- Fill all the pattern info.
- Activate the pattern at the privacy level you want it.
1. Submit the pattern
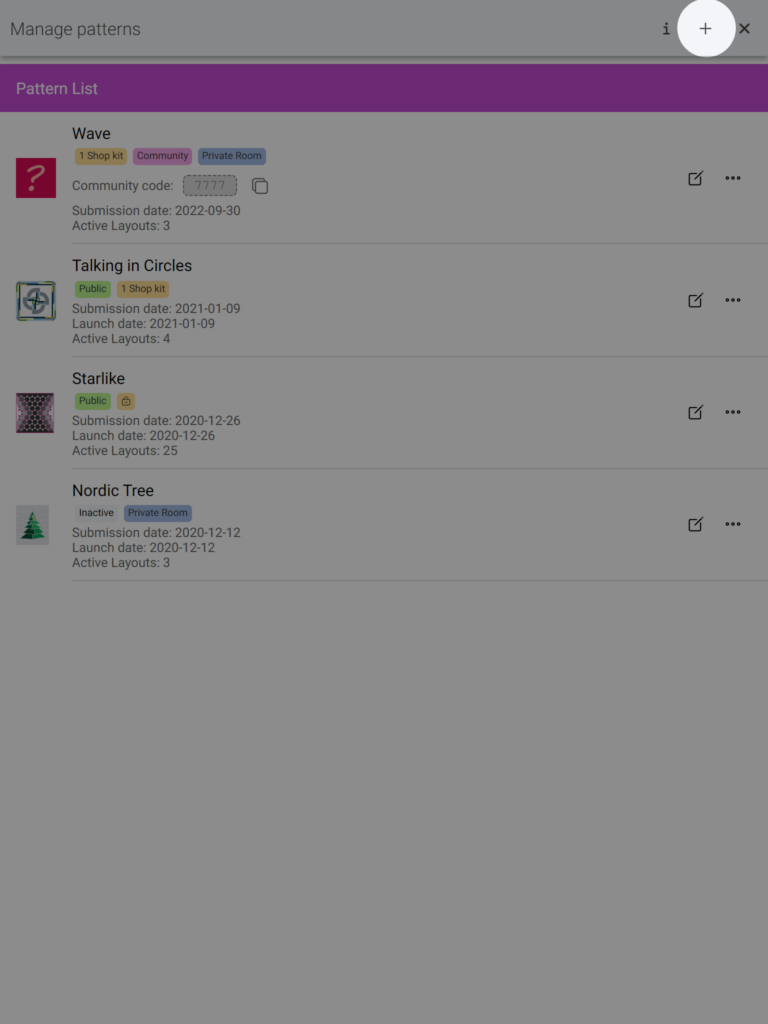
The first step in setting up your pattern in QuiltInk is to create a new pattern in the “Manage Patterns” page and submit the necessary files for us to create the “skeletons.”
The “skeletons” refer to blank diagrams that are prepared by the QuiltInk team. These templates are specifically designed to accommodate your coloring sheet in a format suitable for the QuiltInk platform. The skeletons serve as the foundation on which you’ll create the color layouts for users to color your pattern.
To submit your pattern, follow these steps:
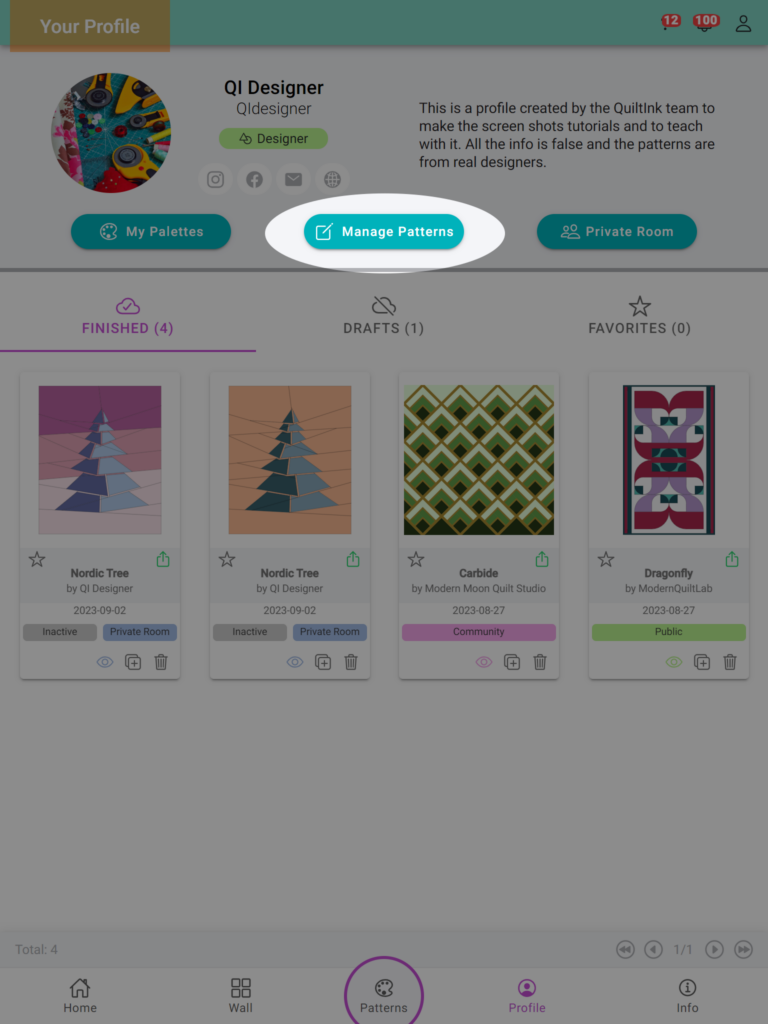
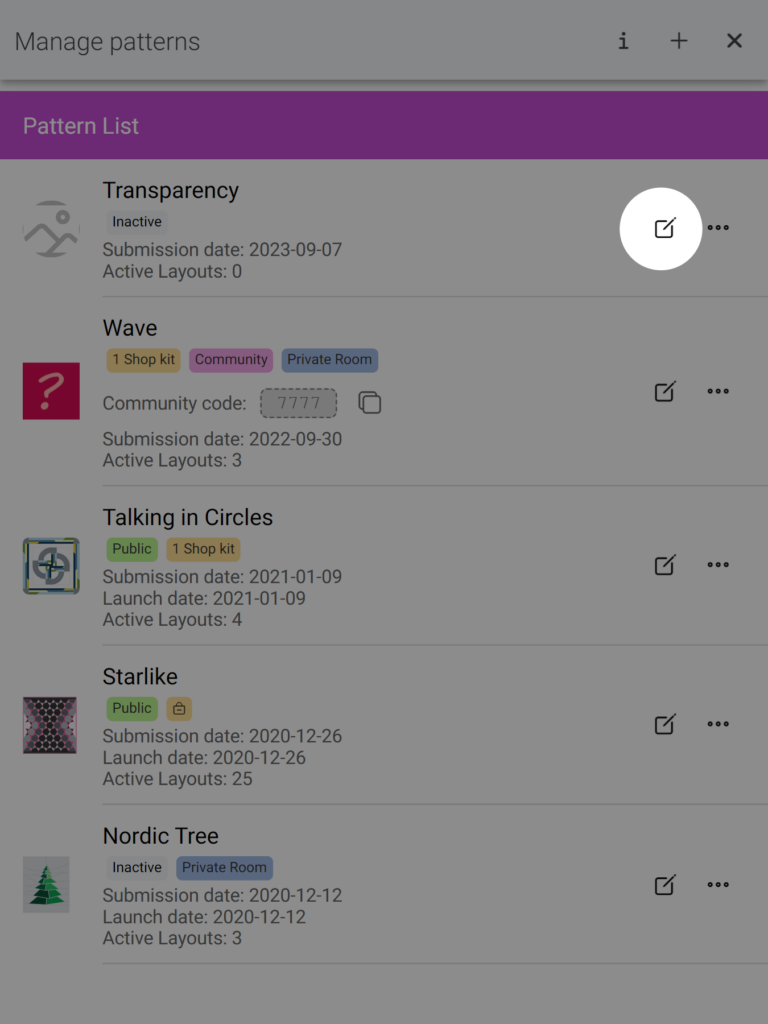
- Go to the “Manage Patterns” page by clicking on the corresponding button in your profile page.
- Click on the “+” icon located at the top bar of the page.
- Fill out the required form to create your pattern in QuiltInk.
- Submit the form. This will create your pattern in QuiltInk but won’t automatically add the diagrams to your pattern page.
- Once we have created the “skeletons” and uploaded them to QuiltInk, we will notify you about their availability.
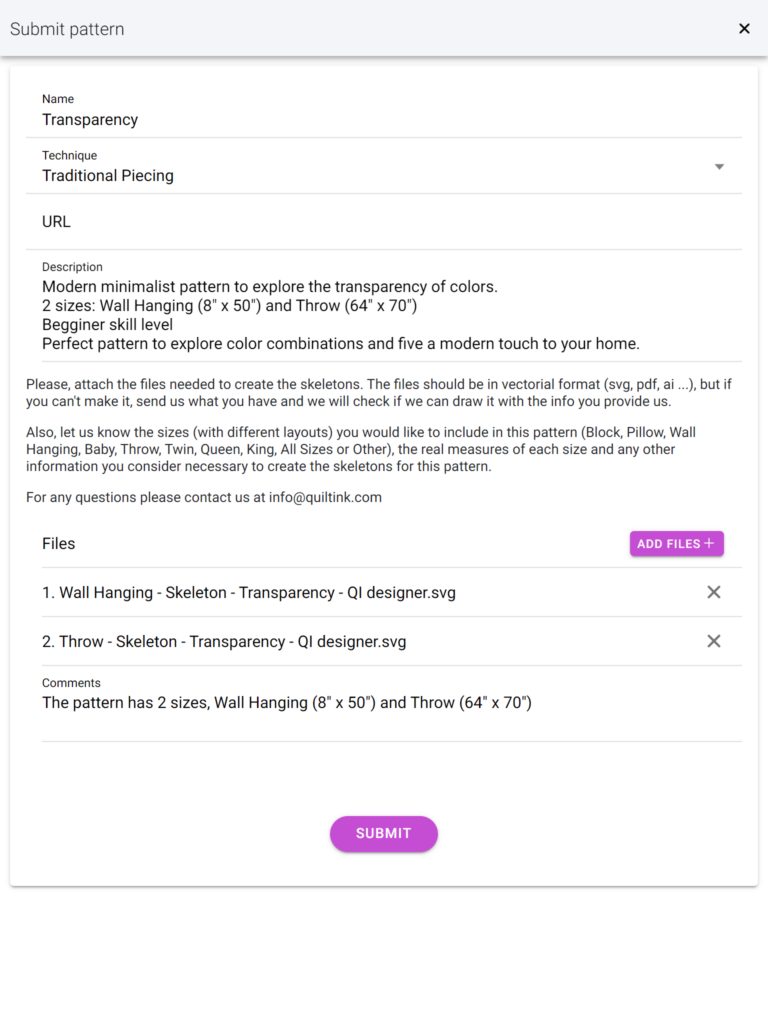

For a more detailed explanation of the submission process and instructions on how to prepare your files for us to create the “skeletons,” refer to the “Submit a pattern” Tutorial. It will provide you with step-by-step guidance to ensure a smooth submission process.
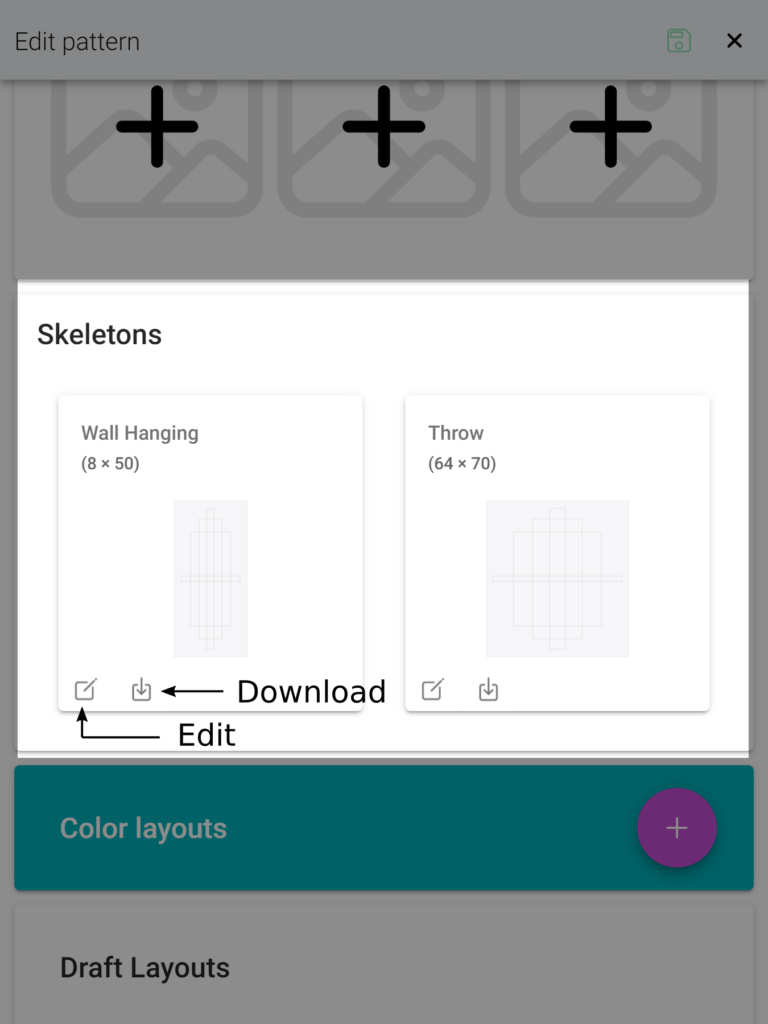
Skeletons section
When the skeletons for your pattern have been uploaded to your editing pattern page, you will be able to view them in the skeleton section.
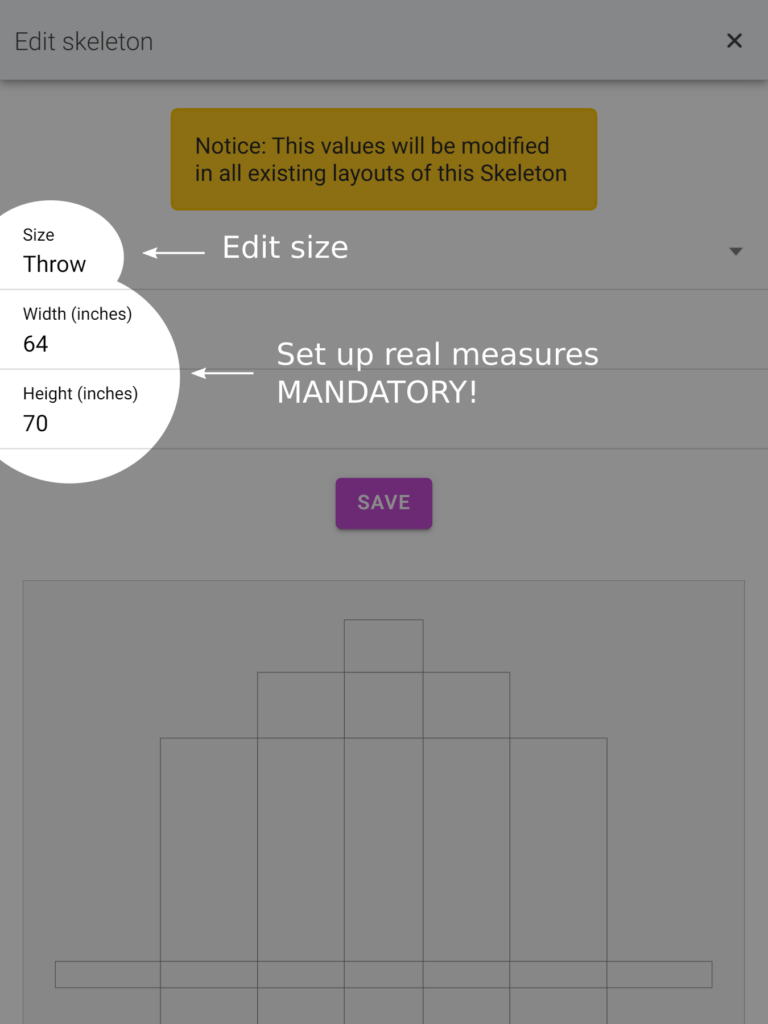
Each skeleton features an editing button where you can define the width and height. To ensure your pattern looks accurate with printed fabrics (for scaling reasons), it is mandatory for each skeleton to have its real measurements set up. If you don’t set up these measurements, you won’t be able to use the skeleton to create new color layouts.
Within the editing button of the skeleton, you can also adjust its size from the one initially set up by the QuiltInk team.
QuiltInk provides the option to download and utilize these skeletons. Clicking the download icon will allow you to obtain the skeleton in vectorial format, enabling various applications such as using it as a coloring page in your pattern.
Designers are not able to create or delete any skeletons from the pattern management section for designers.
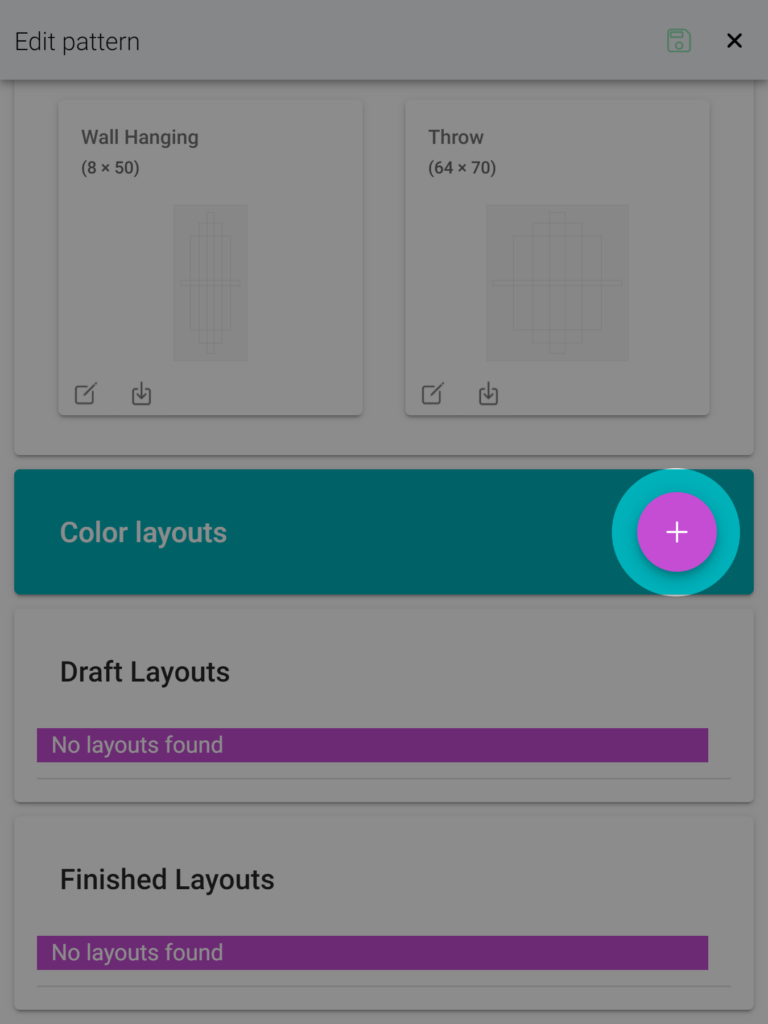
2. Set up the color layouts
Once your skeletons are ready in QuiltInk, it’s time to set up your pattern for activation. Follow these steps:
- Create a Draft.
- Fully color the draft.
- Set up the draft as a finished color layout.
1. Create the draft
First, go to the pattern editing page:
- Go to your Profile: Log in to your QuiltInk account using your credentials. Once logged in, you will be redirected to your profile dashboard.
- Navigate to “Manage Patterns”: Look for the “Manage Patterns” button and click on it. This will take you to the page where you can manage all your patterns.
- Locate the pattern you want to edit: Scroll through the list of patterns on the “Manage Patterns” page. Locate the specific pattern you want to set up and make changes to.
- Access the pattern editing page: Once you’ve found the desired pattern, click on the “edit” icon (pen in a box) associated with it. This will take you to the pattern editing page where you can modify various aspects of the pattern.
In the edit pattern page, follow these steps to create a new draft for your pattern:
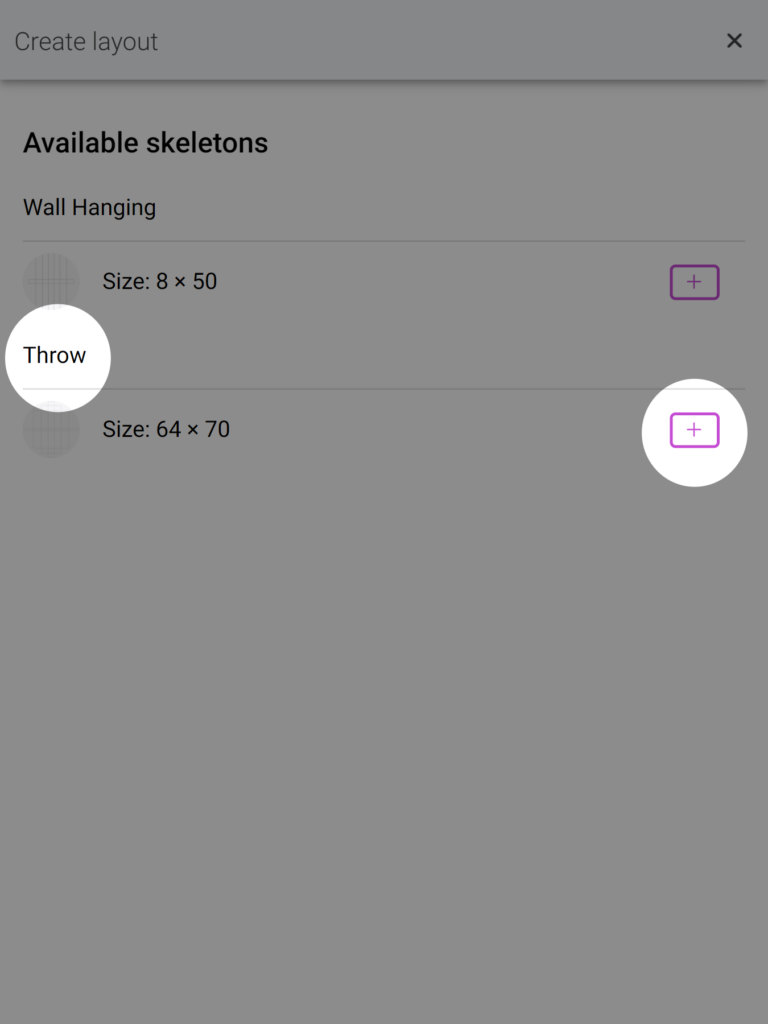
- Click on the purple plus sign, located at the Color Layouts sections, to create a new Draft.
- Select the desired size: In the pop-up window, you will see a list of available sizes for the pattern. Click on the plus sign next to the size you want to create the draft for. This will add the selected size to your drafts.
2. Color the draft
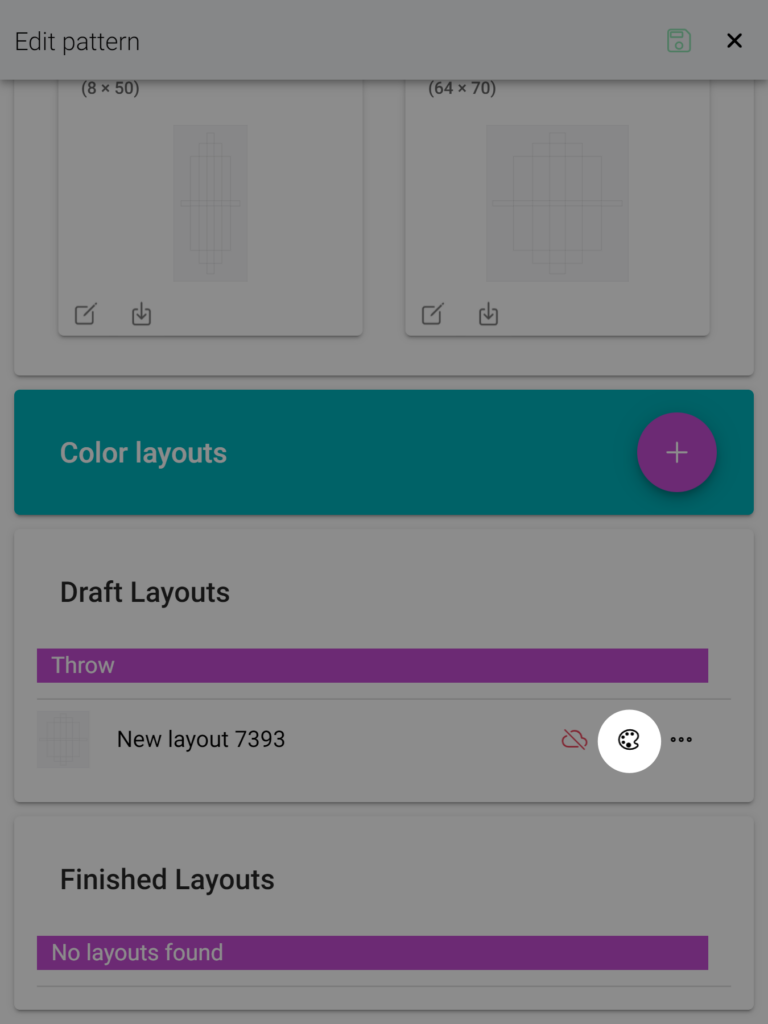
Once you have created a new draft for your pattern, it will be located in the “Drafts” section of the pattern editing page. The draft will be named “New Layout xxxx” by default, but you can change this name later according to your preference.
To color the draft, follow these steps:
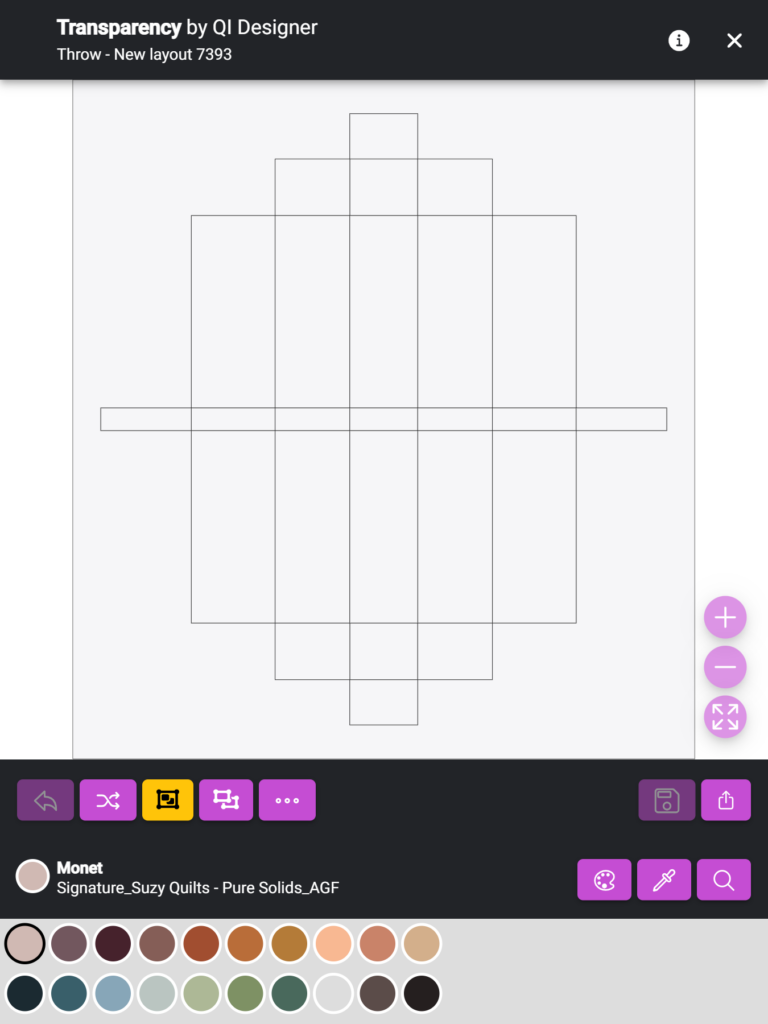
- Locate and click the “palette” icon to open the coloring page for the selected draft. The coloring page allows you to apply colors to the blank skeleton of the pattern in the chosen size.
- Start coloring the layout: You need to color the blank diagram from the skeleton and set up the color layout which will be the basis for the QuitlInk to color your pattern. On the coloring page, you will have access to various color tools and options to apply colors to different elements of the pattern.
For general coloring options in the coloring pages, please refer to the “Color a pattern” tutorial.
As a designer, it’s important to be aware of specific coloring features that can greatly enhance the process of setting up color layouts for your patterns. Keeping these features in mind will not only help you work more efficiently but also achieve better results. Some of these useful features include:
1. Choosing the Palette
The first step to start coloring is selecting the palette you want to use for your color layout. When setting up a color layout, you have two options:
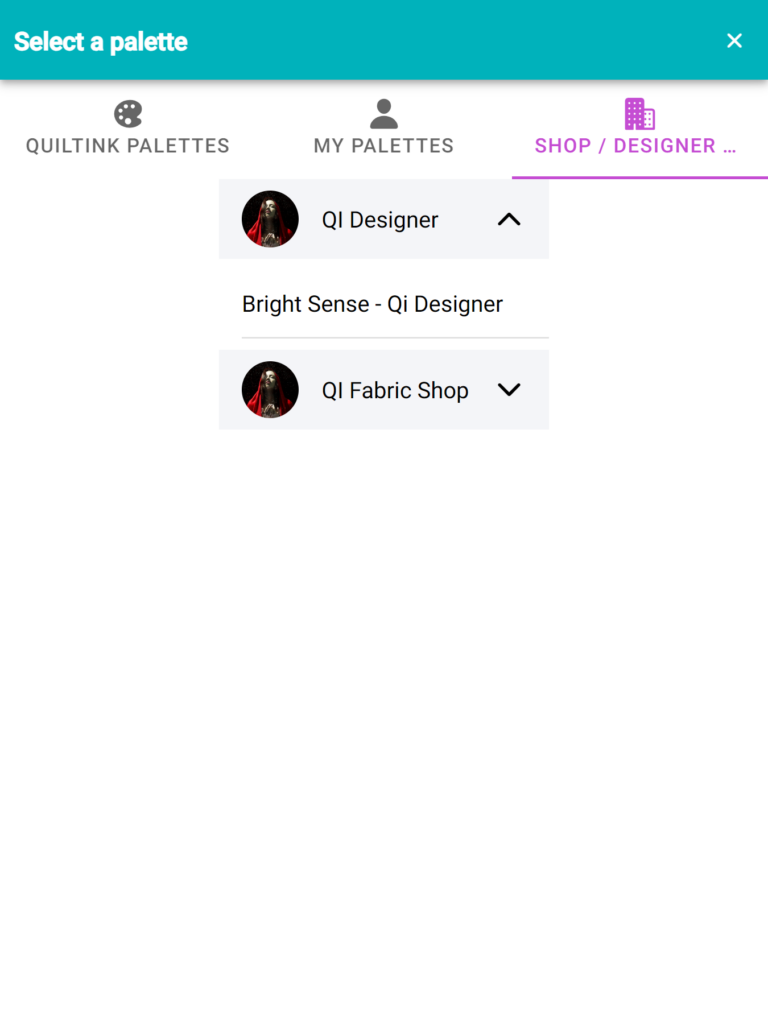
- Solid Palettes from QuitlInk: These palettes are provided by QuiltInk and feature solid colors representing swatches from various solid fabrics by different companies.
- Shop/Designer Palettes: These are custom palettes created by Fabric Shops and Fabric Designers in QuiltInk and made public to color. They are made available to all QuiltInk users for coloring and can include both printed fabrics and solid colors.
Please note that your custom palettes are not available for setting up color layouts, as they are designed for more private use.
If you are not only a quilt pattern designer but also a fabric designer, QuiltInk provides you with the opportunity to showcase your custom palettes featuring your fabrics. By making your custom palettes public, you can prominently display them in the color layouts of your patterns. This allows your fabrics to be showcased on the main page of QuiltInk, where users can utilize them to color any pattern available on the platform. It’s an excellent opportunity to promote your fabrics and enable people to plan their projects using your fabrics.
By sharing your custom palettes with the QuiltInk community, you can increase your visibility as a fabric designer and attract potential customers who are looking for high-quality fabrics to use in their quilting projects. It’s a mutually beneficial arrangement that enhances your brand exposure while providing users with a wider range of fabric options to explore and incorporate into their designs.
Take advantage of this feature to promote your fabrics and engage with the QuiltInk community, as it can contribute to the growth of your business and strengthen your presence in the quilting industry.
2. Merging pieces by color
One of the standout features of QuiltInk that greatly simplifies the coloring process compared to other platforms is the ability to merge pieces by color. When pieces are merged by color, clicking on one piece will automatically change the color of all other pieces with the same color. This makes coloring faster and more enjoyable for your customers, allowing them to create numerous mock-ups in a short amount of time.
As a designer, you can take advantage of this feature while setting up your color layouts. You have the option to merge the pieces by color, so when users open the coloring pages, it’s already done for them. However, users also have the flexibility to merge or unmerge pieces as they prefer.
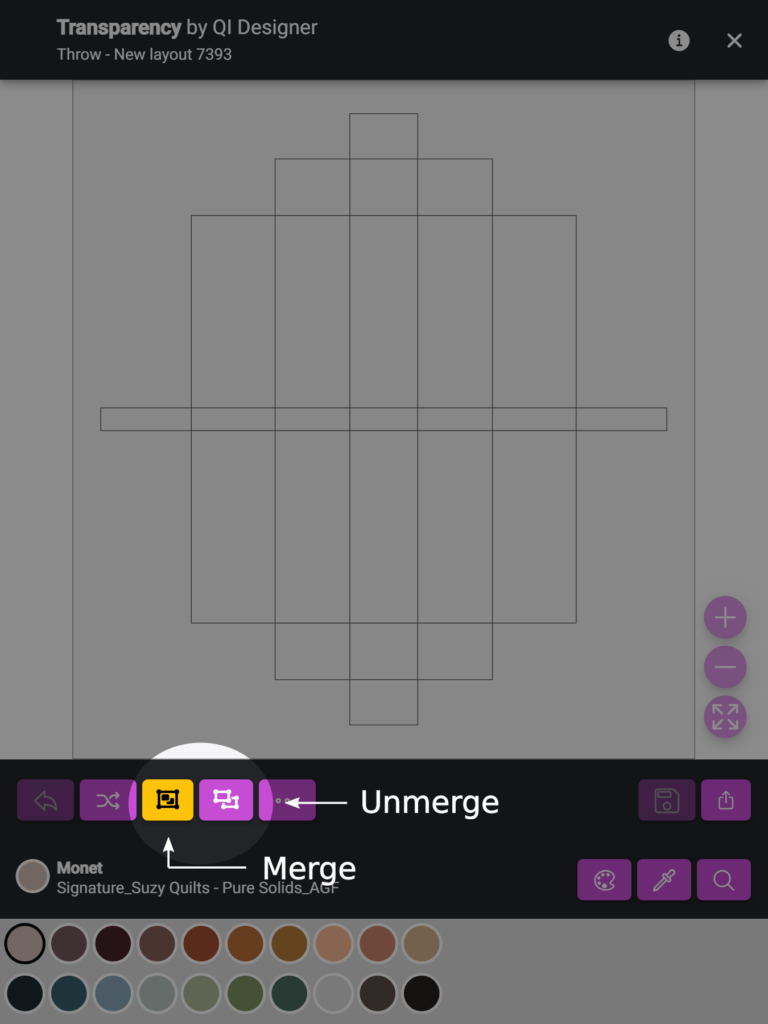
To group or ungroup pieces of the same color, use the icons below:
- The icon on the left side of the highlighted area merges the pieces by color. When clicked, all pieces with the same color will change simultaneously. This is particularly useful if you have predefined color distributions in your pattern.
- The icon on the right side of the highlighted area unmerges the pieces. Users can then color the pieces individually and create custom colorings. Additionally, if a user needs to add or remove a piece from the group while coloring, this tool can be used.
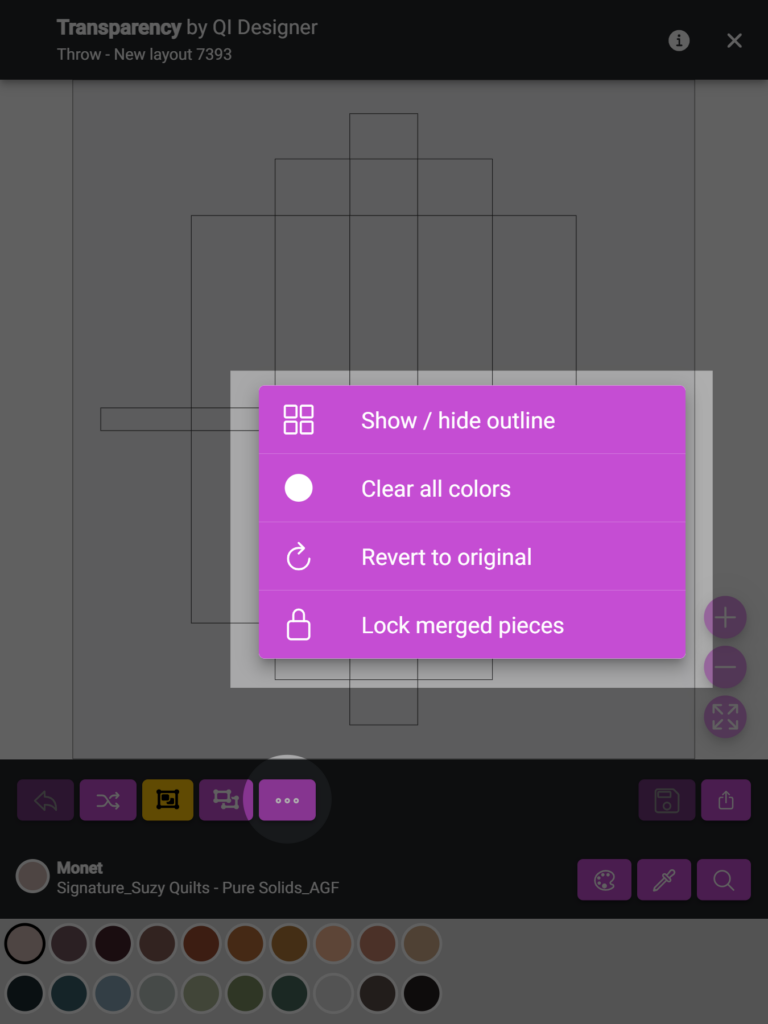
3. Lock the merged pieces
Once you have finalized the grouping of pieces by color in the desired color layout, you have the option to lock the merge using the “…” icon in the left-side menu. Locking the merged pieces prevents users from changing the color distribution. However, if you don’t lock the merged pieces, users will have the freedom to create their own custom colorings and merge or unmerge pieces as they wish.
Please note that once the merge is locked, it cannot be undone. Therefore, it’s important to ensure the color layout is correct before applying the lock.
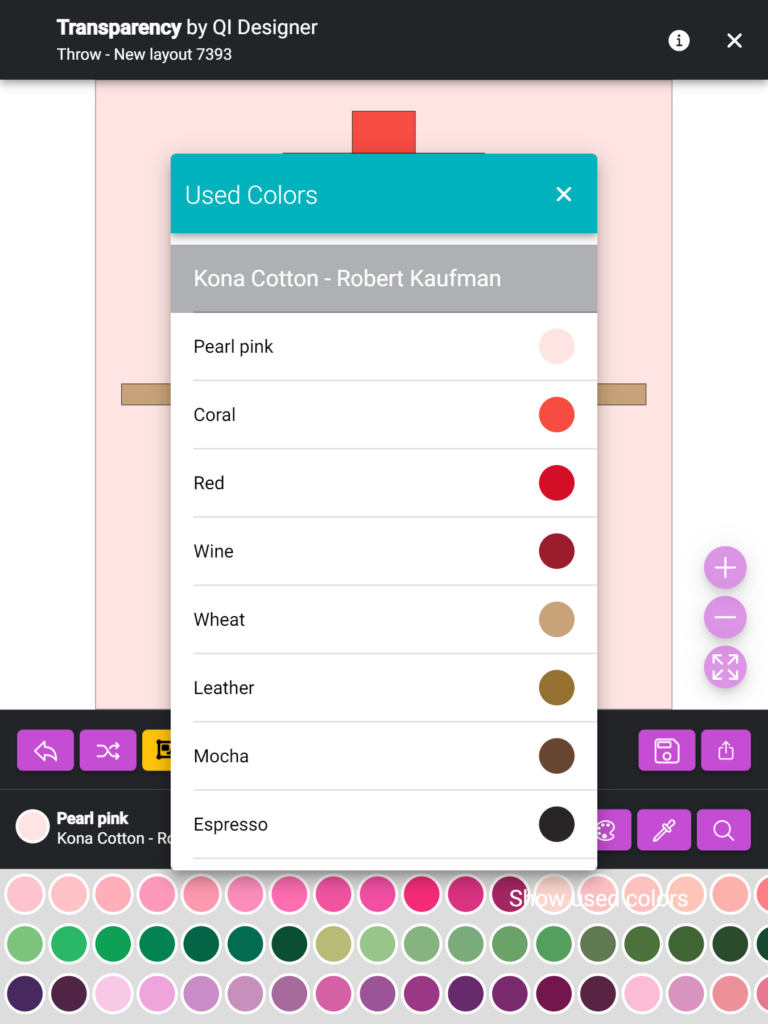
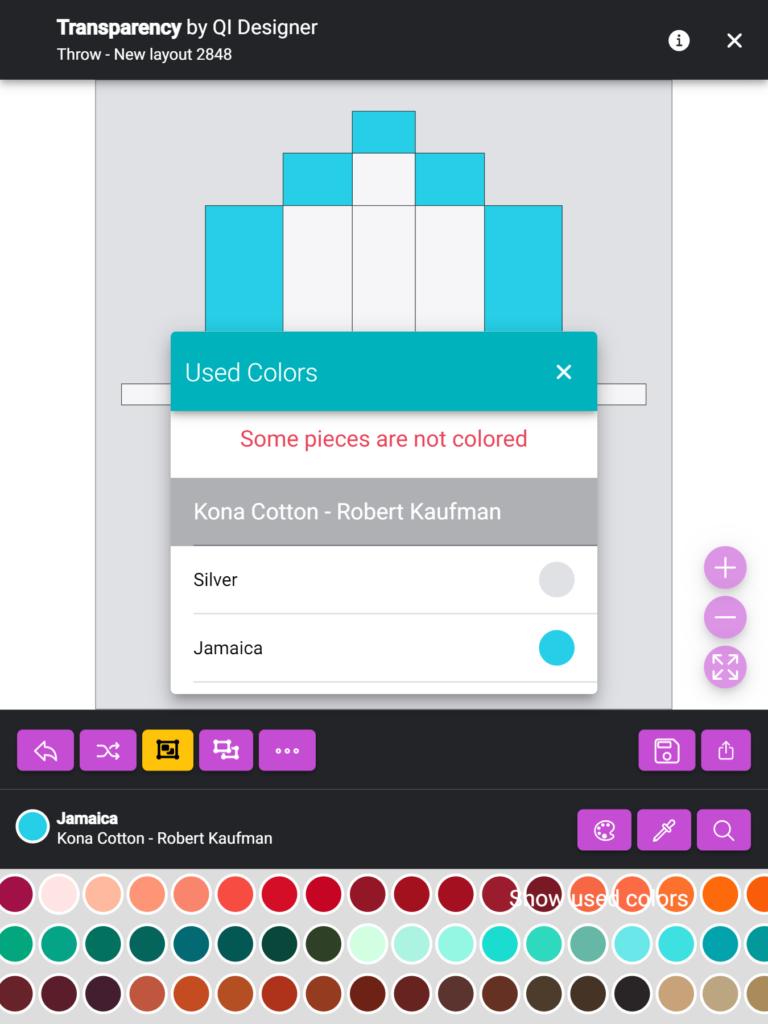
4. Used colors
The knowledge of the colors/fabrics already used while you are setting up a color layout is really useful, especially for designers.
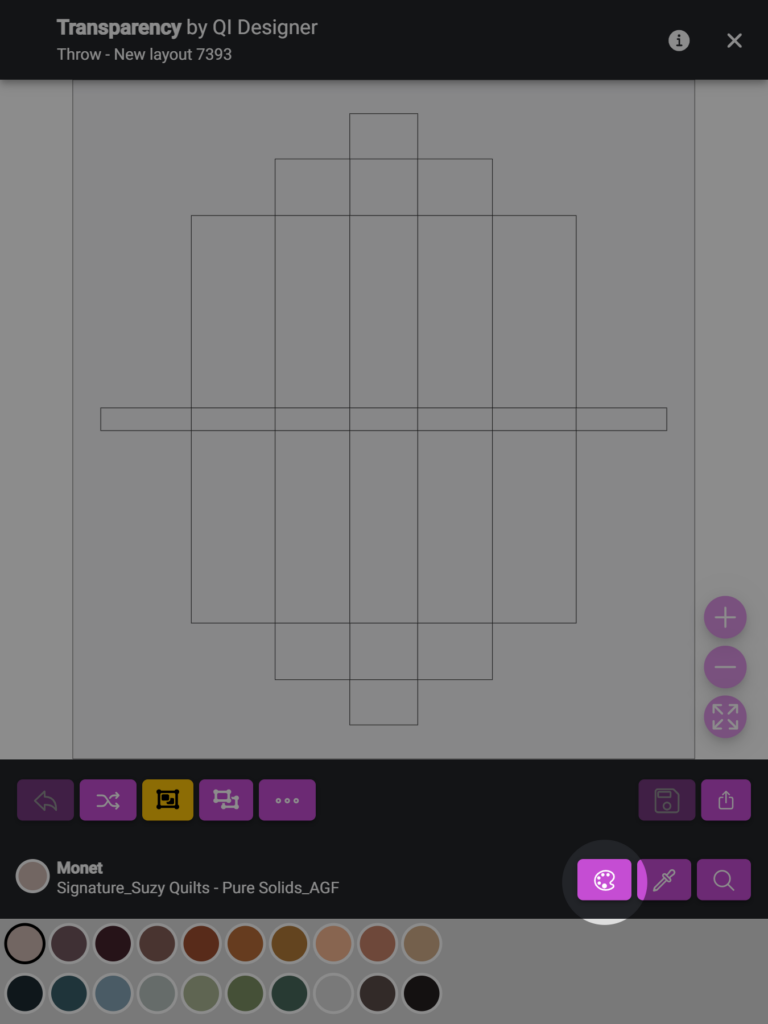
By clicking the “pickdorp” icon, you will be able to know the colors already used in this layout and you will be able to select them, just by clicking over them in the list of colors used.
This option can save you a lot of time, because if you need to use the same color twice, you don’t have to search for it in the list, and it can avoid some mistakes about using two similar colors but that will appear as different one when merging the pieces by color.
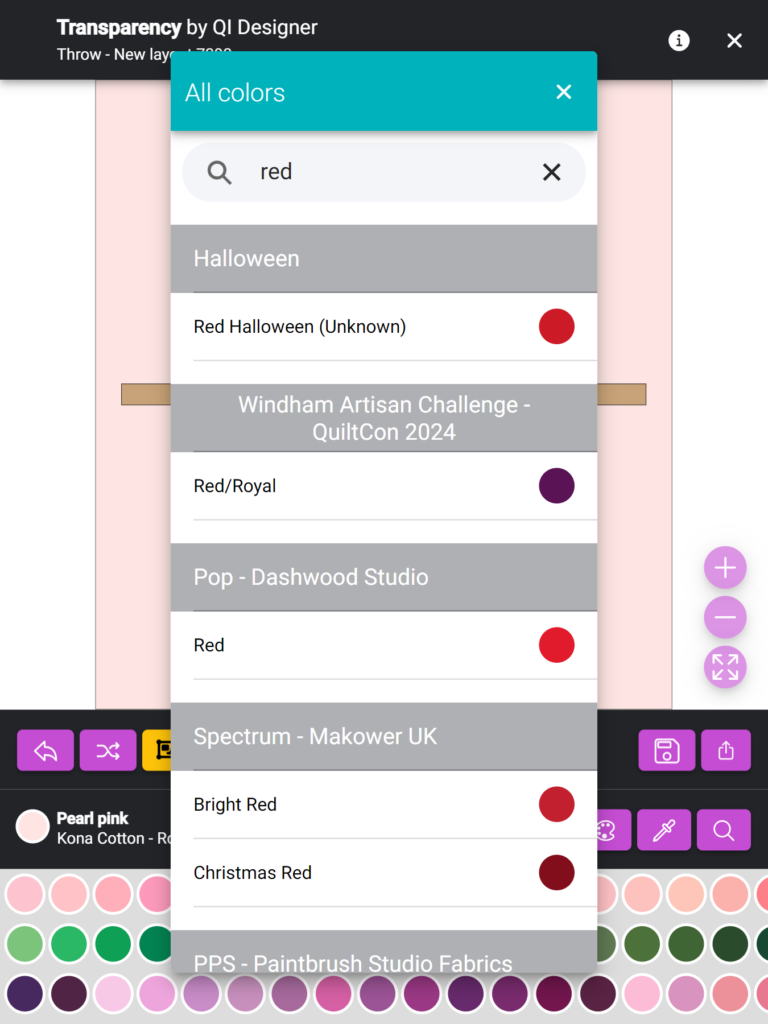
5. Color/Fabric Searcher
Another highly useful tool in the coloring pages is the color/fabric searcher. This feature can save you significant time and greatly simplify the coloring process.
With the color/fabric searcher, you can quickly search for specific colors or fabrics from the available options. Instead of manually scrolling through a long list, you can simply type in the name or keyword related to the color or fabric you’re looking for. The searcher will filter the options, making it easier for you to find the desired color or fabric in no time.
FINAL CHECKS
Before publishing a color layout as finished, it’s important to ensure that all pieces have been assigned a color. You can easily check this by clicking on the dropper icon, which will open a window displaying the list of colors included in the layout. If any piece is missing a color assignment, a red message will appear at the top of the list, indicating the missing pieces.
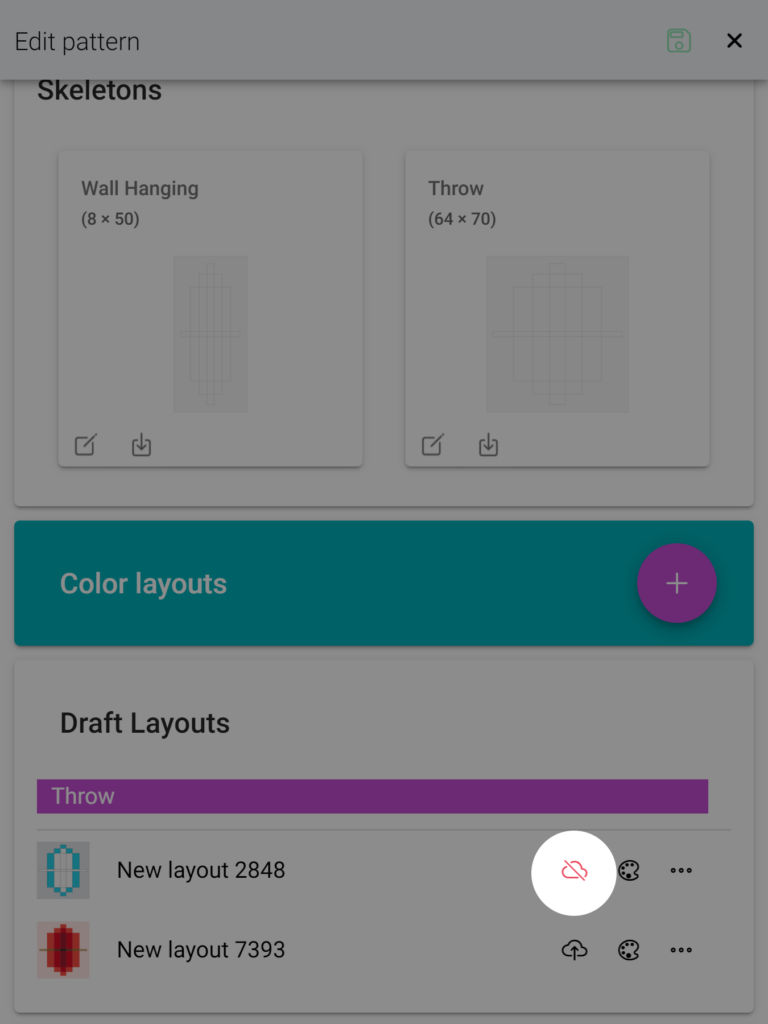
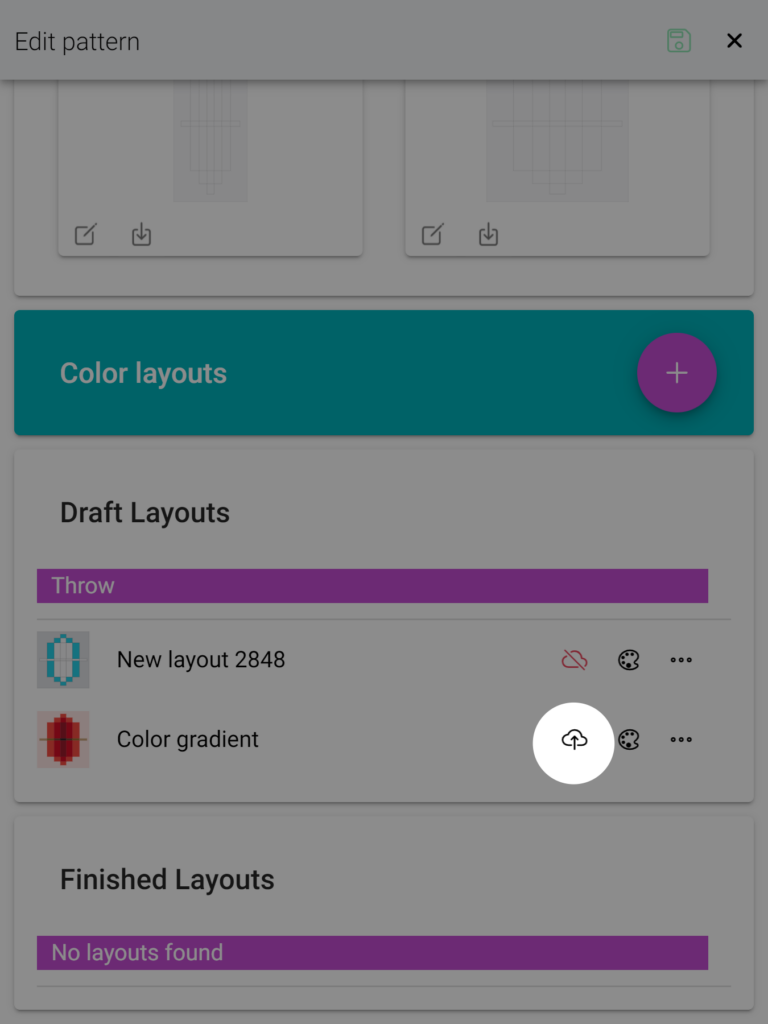
Another way to confirm that all pieces have color is by checking the cloud icon used to convert the draft into a finished color layout. If the cloud icon is crossed out, it indicates that some pieces still lack color, and you need to complete the coloring of this draft.
When you have completed the necessary edits and are satisfied with your color layout, remember to click on the floppy disk icon to save your draft. Saving the draft will not publish the color layout immediately, allowing you the flexibility to return and make further edits if needed.

MANAGE DRAFT OPTIONS
Within the Manage Draft options, you have several choices for editing and managing your drafts. These options allow you to make changes and adjustments to your color layouts:
1. “Cloud” icon: This icon is used to publish a draft as a finished color layout. The icon has two modes:
- Red crossed: This indicates that the draft has some pieces without color, making it unfinished and ineligible for publication.
- Black cloud with an arrow: This signifies that the draft is complete and can be published as a color layout, making it available for QuiltInk users to color your pattern.
2. “Palette” icon: Clicking on the palette icon allows you to access the coloring page for the selected draft. This feature enables you to make color changes and modifications to the draft. You can continue to refine and adjust the colors as needed.
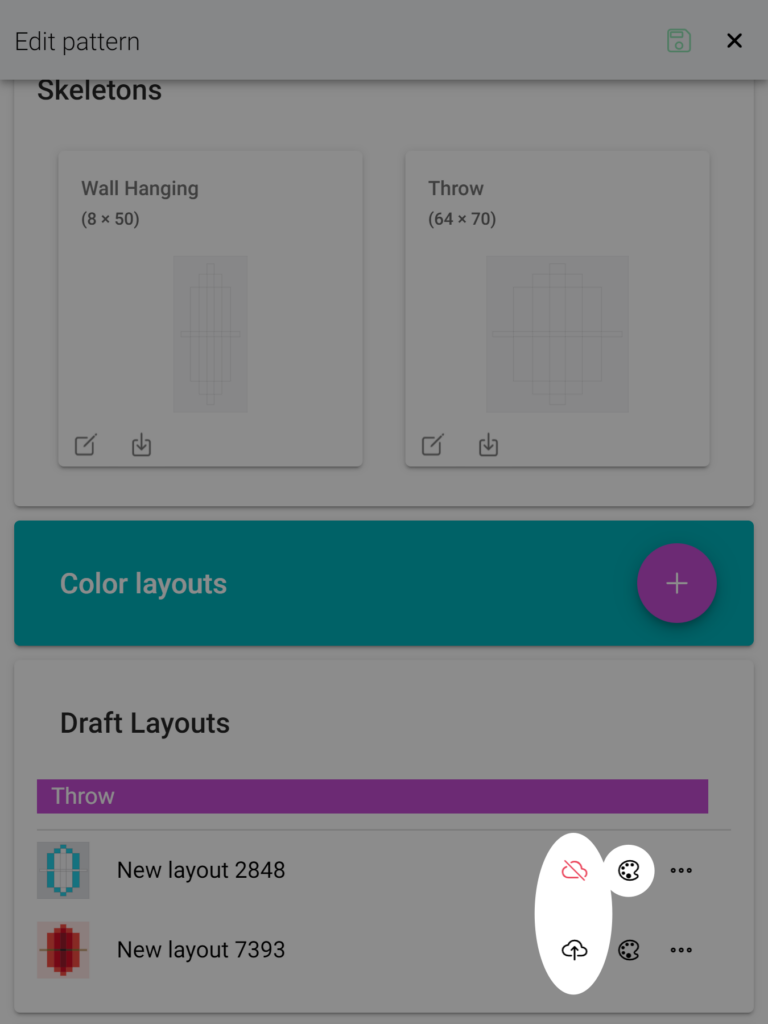
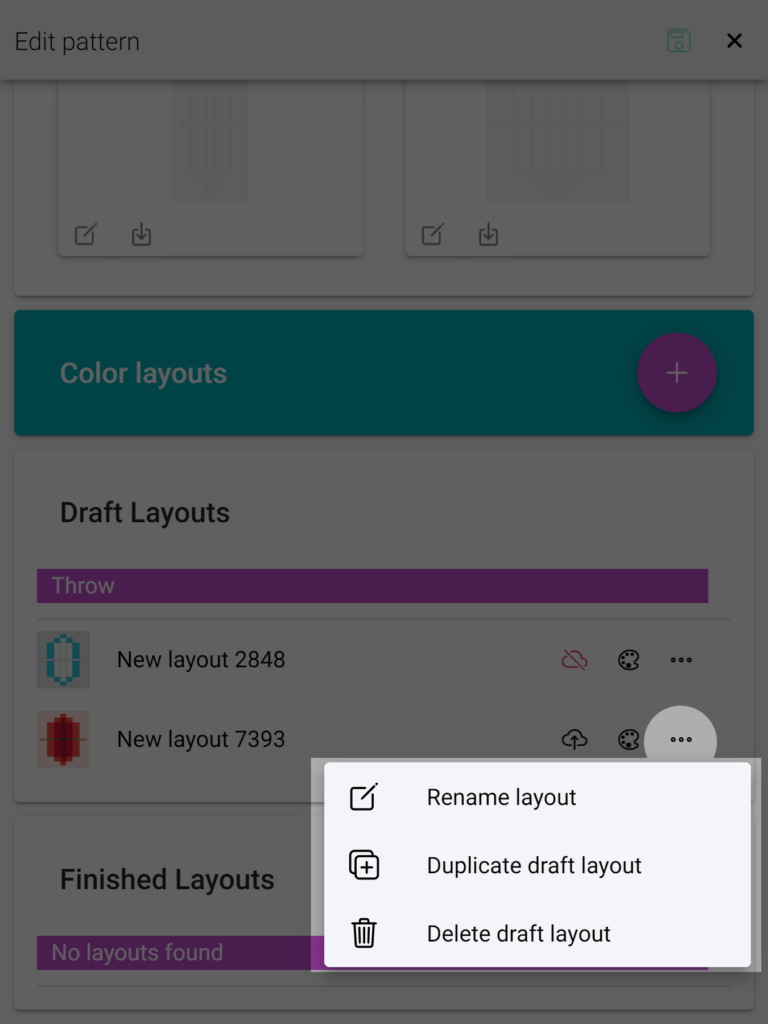
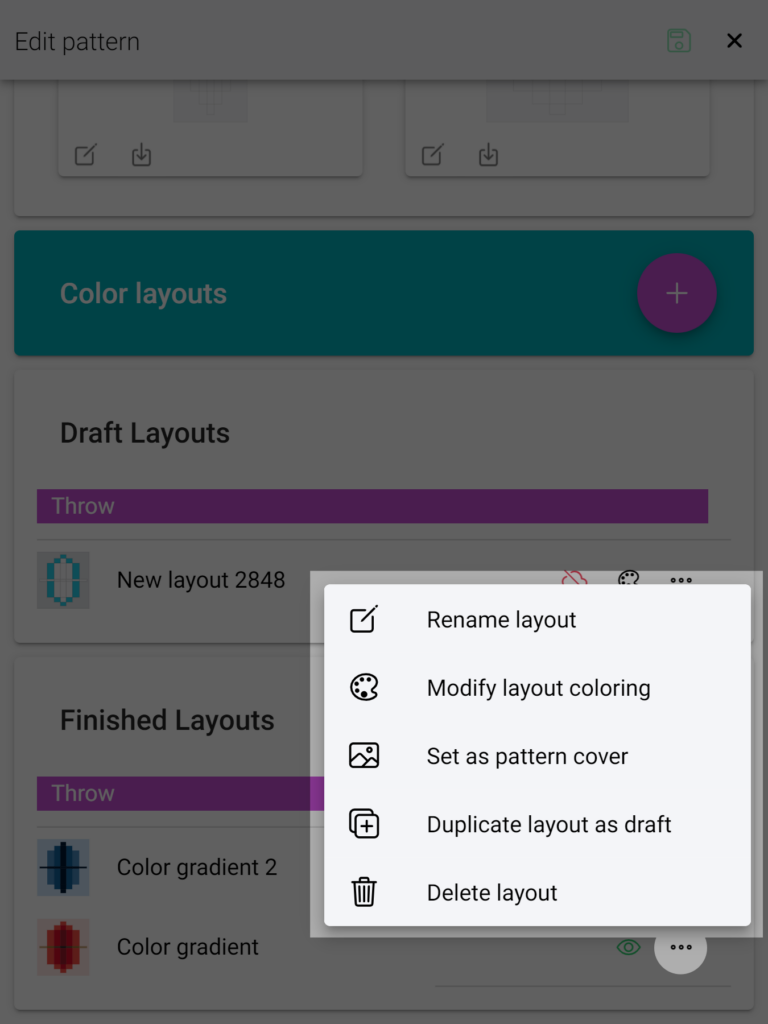
3. “···” icon: This icon provides additional options for managing your draft layout. When you click on the “···” icon, you will see a dropdown menu with the following options:
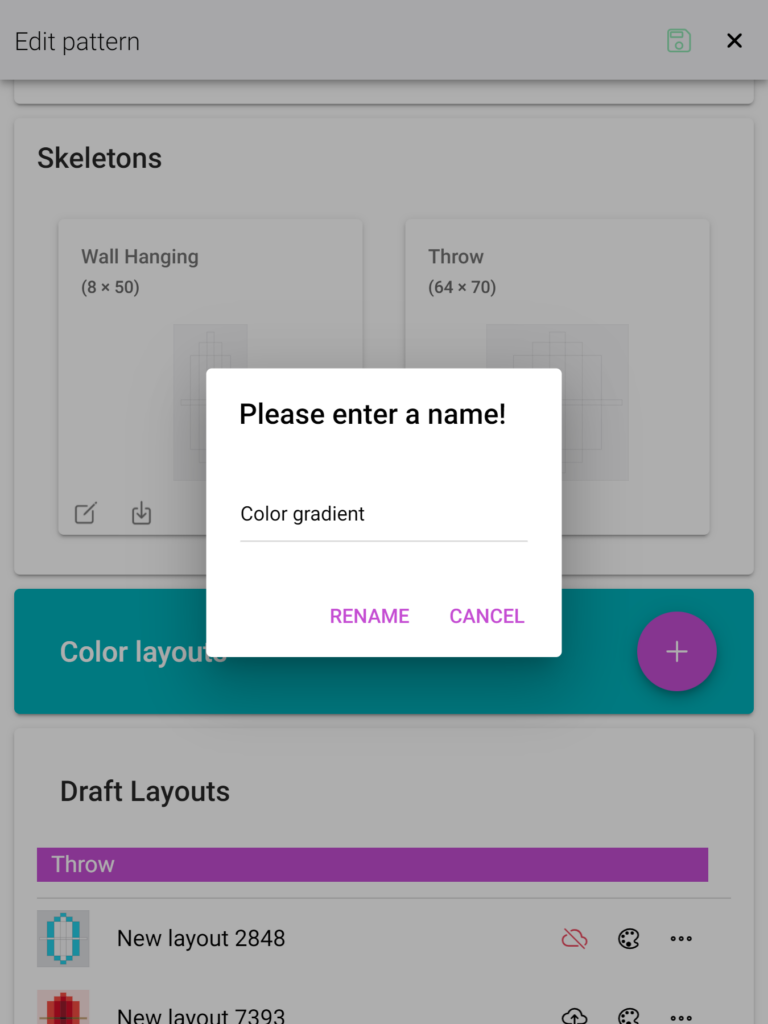
- “Rename layout”: Selecting this option will open a new window where you can modify the name of the color layout. It is important to choose a descriptive name that helps QuiltInk users identify the specific color layout they want to use for coloring your pattern. You can use indicators such as the number of colors (2 color, 4 colors, multicolor,…), color range (warm colors, cold colors,….), or any other naming convention that makes sense for your design.
- “Duplicate draft layout”: This option allows you to create a new draft layout based on a previous draft you have created. Instead of starting from a blank skeleton, you can duplicate an existing draft and make color changes or modifications. This can save you time, especially if you want to maintain the same merging layout but only need to adjust the colors.
- “Delete draft layout”: If you wish to remove a draft from your Manage Patterns, you can select the “Delete draft layout” option. Please note that this action is irreversible, so make sure you want to permanently remove the draft before proceeding.
3. Publish the draft as finished
Once you have completed all the necessary settings, you can turn the draft into a finished color layout. To do so, click on the cloud icon to publish the color layout. Remember that the cloud icon needs to be black, indicating that all the pieces have been colored. If it’s red, you still need to finish this draft.
Each color layout has several options for management:
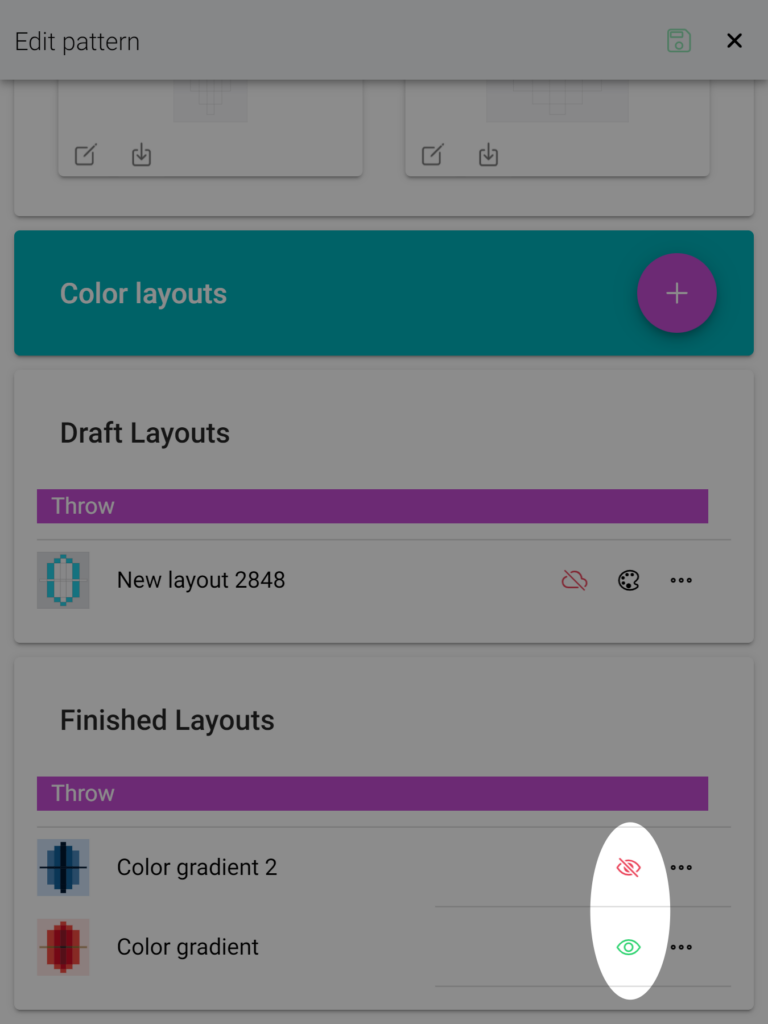
- “Eye” icon: This option allows you to activate or deactivate the color layout for public viewing. By clicking on the eye icon, you can toggle the visibility of the color layout. When you turn a draft into a finished color layout, it makes the color layout automatically public for users. You can deactivate it at any moment.
Color eye icon indicates the activation state of the color layout:- Green eye: this color layout is active and visible by users at the pattern page.
- Red crossed eye: This color layout is not active and not visible at the pattern page.
- “···” icon: This icon provides additional options for managing your finished color layout. These options include:
- “Rename layout”: By selecting this option, you can rename the color layout.
- “Modify layout coloring”: If you need to make amendments to the color layout or change certain colors, you can click on this option. It will open the coloring page of the layout with the colors/fabrics you saved as a draft. Make the necessary changes and remember to save them.
- “Set as pattern cover”: Every pattern requires a cover image to be displayed on the pattern page and the designer profile page. With this option, you can choose which color layout you want to set as the cover image for your pattern. Setting up a cover image is necessary to activate the pattern.
- “Duplicate layout as draft”: This option allows you to create a new draft using the existing color layout as a basis. After modifying the draft, you can publish it as a finished layout.
- “Delete layout”: If you wish to remove a color layout from your Manage Patterns, you can use this option. However, please note that if the color layout has already been used by any user to create mock-ups, it cannot be removed. In such cases, you can deactivate the color layout by clicking on the eye icon.
4. Fill all the pattern info
Once you have completed all the color layouts, it’s time to set up the pattern information. Here are the details you need to consider:
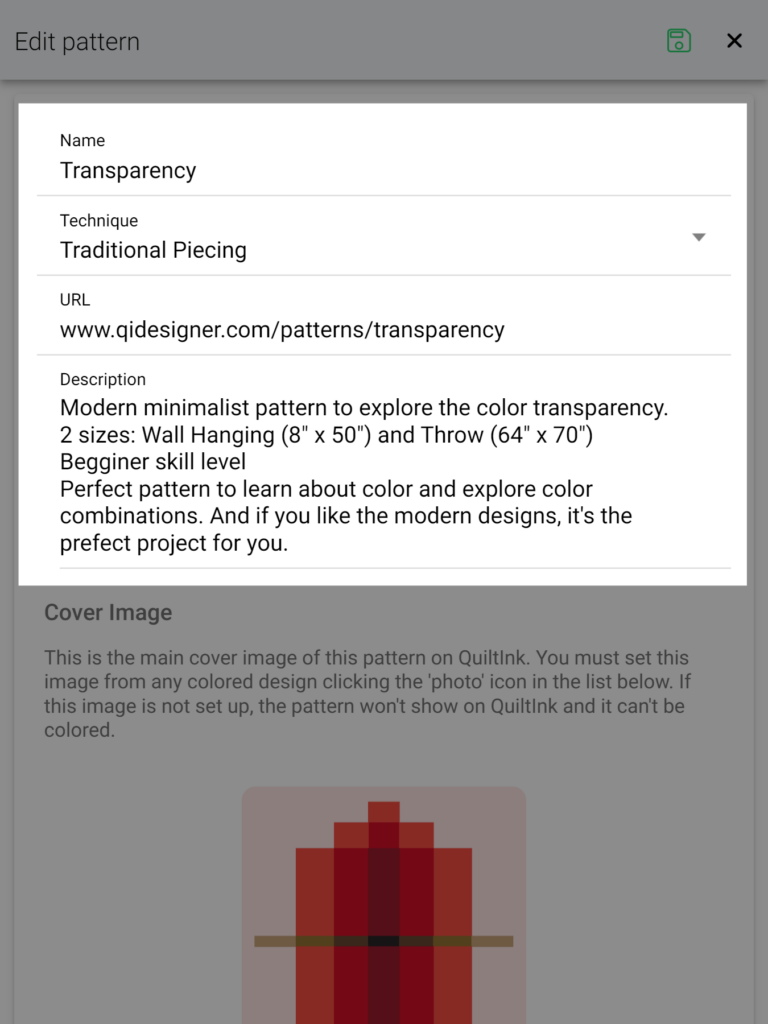
- Pattern name: You can edit the pattern name from the one you initially provided when submitting the pattern. Choose a name that accurately represents your pattern.
- Technique: Specify the technique used in your pattern. It will serve as a filter on the QuiltInk main patterns page.
- URL: This link will be the destination when users click the cart icon in the coloring pages of your pattern and the pop-up when clicking on a mock-up in the Wall. It is recommended to include the link to the website where you sell your pattern. Ensure the URL is correct and leads users to the appropriate location.
- Description: Provide relevant information about your pattern in this section. Include details such as inspiration, technique, sizes, skill level, and any other information that you think is important for QuiltInk users to know. This information, along with photos and images, will appear when users click the “i” icon in the coloring pages and the pop-up when clicking on a mock-up in the Wall.
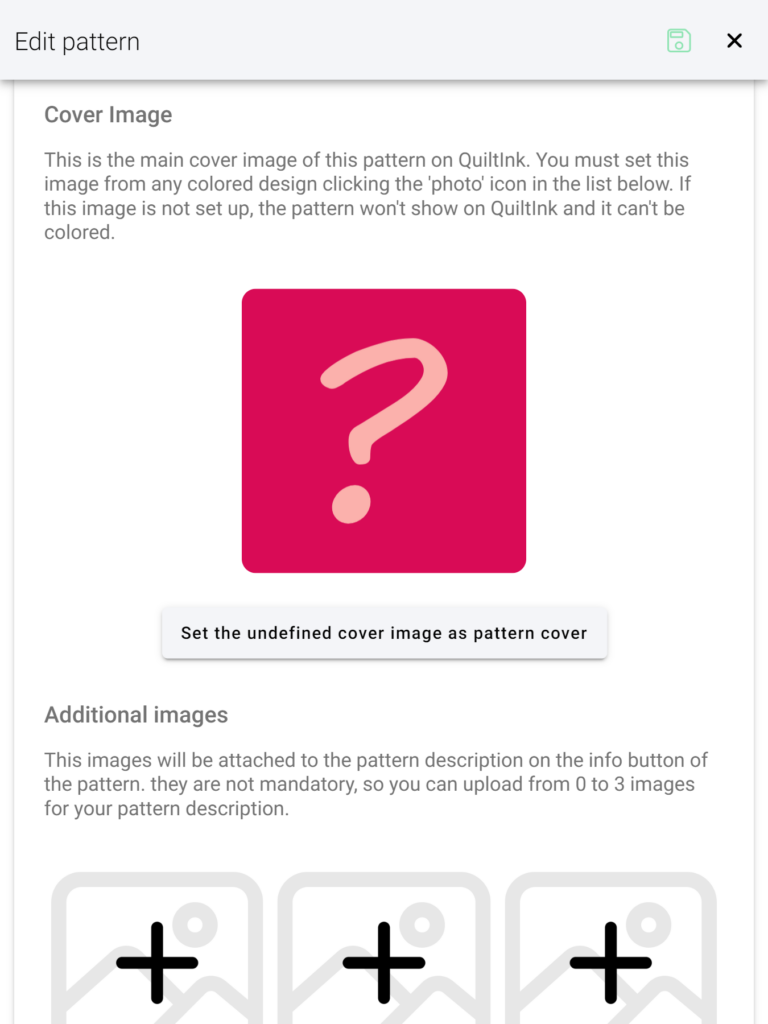
- Cover Image: The cover image serves as the primary visual representation users will see when browsing through patterns on the main page and your profile page. It’s selected from one of the finished color layouts you’ve set up for the pattern. To set the cover image, access the “…” options of the desired color layout and choose the one you want to use. This step is crucial to activate the pattern.
Alternatively, you have the option to set up an undefined cover image by clicking below the cover image box. This can be useful for cases like Community patterns where you want to keep the design hidden from the public and exclusive visible to your community. - Additional Images: Upload photos, graphics, or images that best describe your pattern. This is a good place to include an image of the fabric requirements, for example. Choose visuals that enhance the understanding and presentation of your pattern.
Note that only the cover image is necessary to activate your pattern. However, it is strongly recommended to fill out all the other fields to provide a well-presented image of your pattern in QuiltInk and offer useful information to users who color your pattern.

5. Activate your pattern
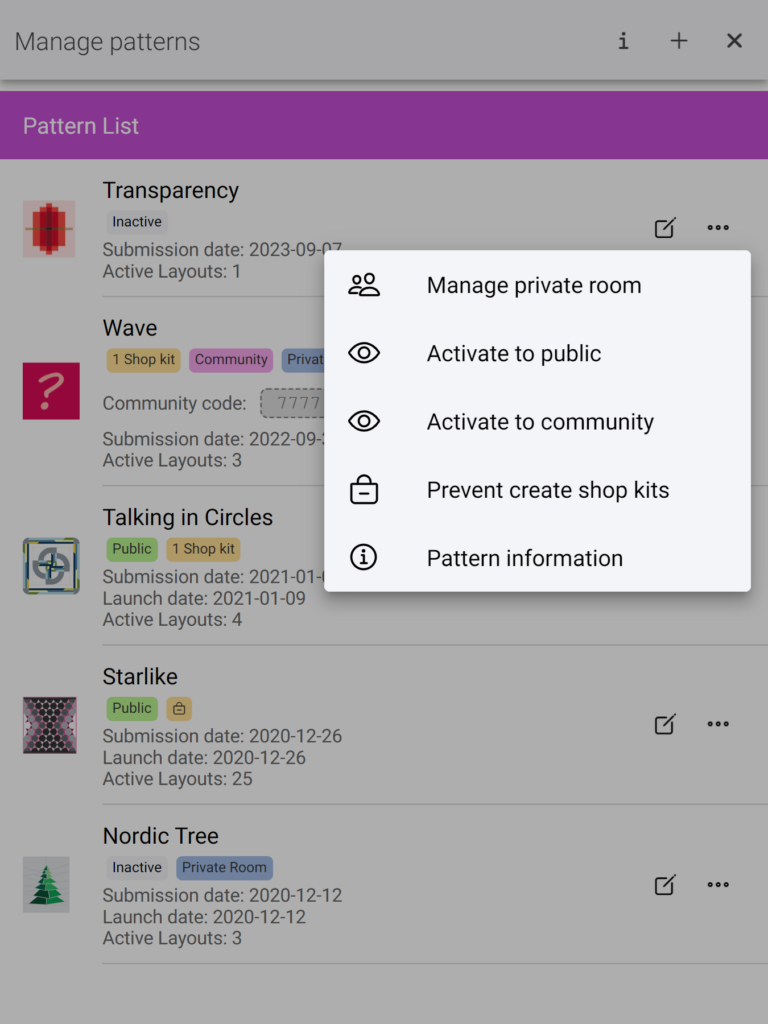
Once you have completed your pattern setup, you can choose the privacy level for your pattern. Here are the different options available:
- Public: Selecting this option will make your pattern visible on the pattern main page and your profile page, and it will be accessible to any user of QuiltInk.
- Community: This pattern will be also visible but users who want to access the pattern will need a specific code to color it. This option is ideal for creating a sense of exclusivity and sharing your pattern with a specific community or group.
- Private Room: By selecting the private room privacy level, you can restrict access to your pattern to specific QuiltInk users whom you have invited to join the private room. This option is useful for sharing your pattern with a select group of individuals, such as testers, fabric shops, or friends, before its official release. To set up a private room the pattern can be in an inactive mode.
All the privacy options for your patterns, among other settings like allowing or not allowing kits and access to info/statistics, can be managed from the “…” icon related to the pattern on the Manage Pattern page.
For more detailed information on how to set up the privacy level for your pattern, you can refer to the “Patterns Privacy Levels” tutorial. It will provide step-by-step instructions and additional guidance on managing the visibility and accessibility of your pattern.
If you have any questions or concerns related to setting up your patterns or any aspect of using QuiltInk, we are here to help. You can reach out to us via email at info@quiltink.com or through the chat on our Instagram platform (@quilt_ink).