
Having a user account on QuiltInk provides several benefits and allows you to save and manage your mock-ups.
Remember, signing up for a user account on QuiltInk is free, and it unlocks numerous benefits that enhance your quilting experience. So go ahead, create an account, and start enjoying all that QuiltInk has to offer!
Save your Mock-ups
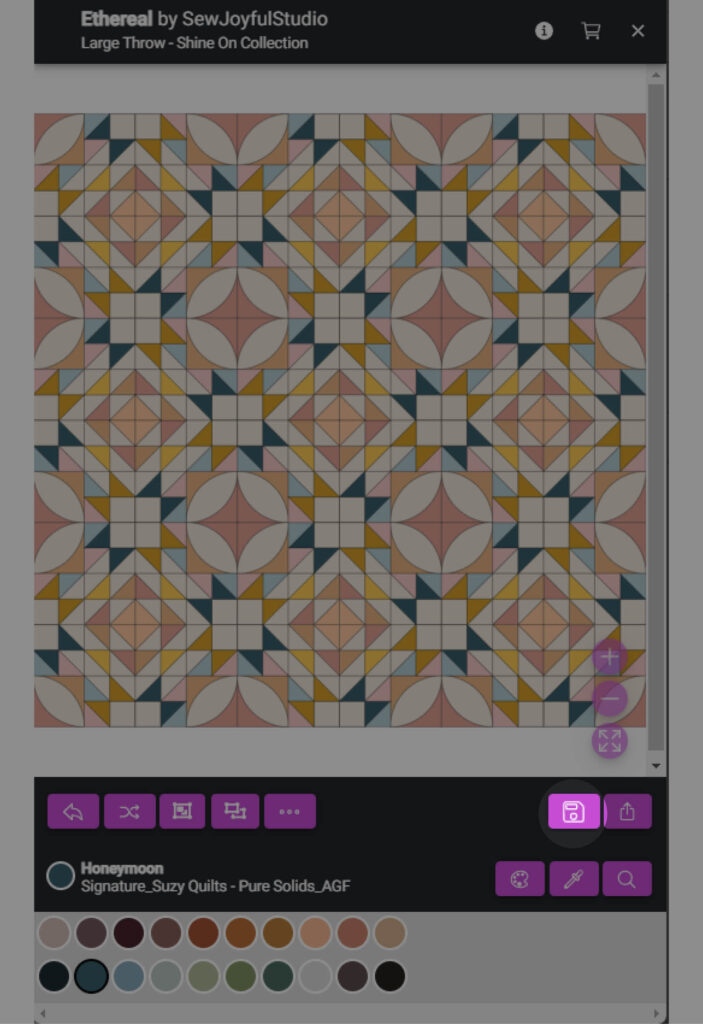
When you finish coloring a pattern in the QuiltInk coloring page, you can save it by clicking on the “Floppy Disk” icon located at the bottom right corner of the page. Saving the mock-up gives you the option to choose from two different options:
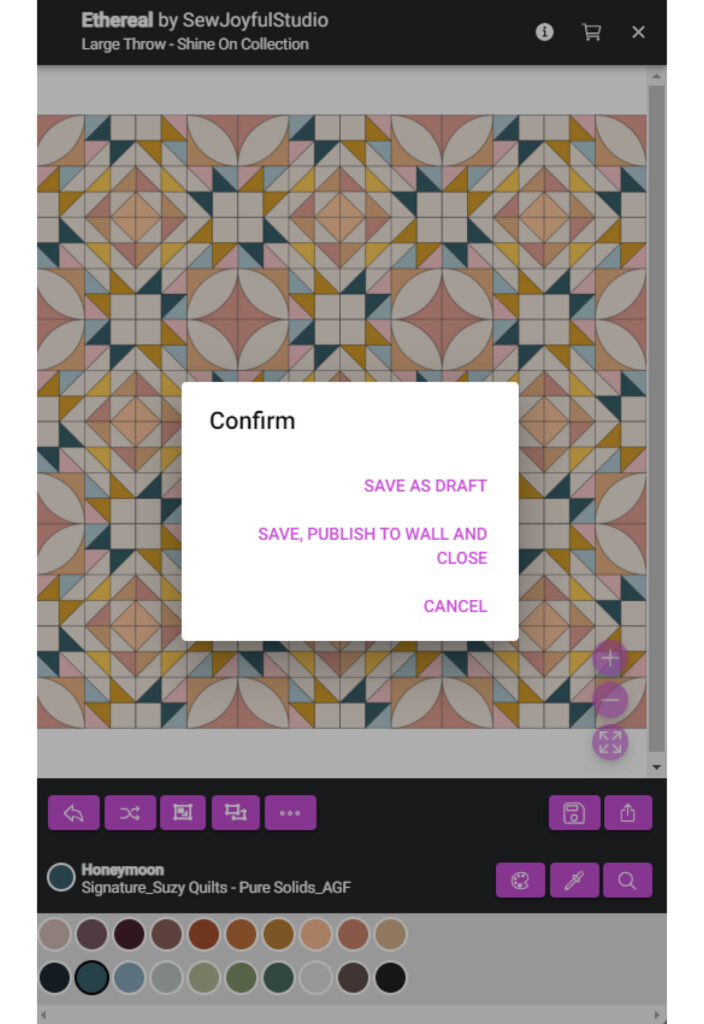
1. Save, Publish to Wall and Close: If you are satisfied with your coloring and consider it complete, you can select this option. It performs the following actions:
- Saves the mock-up and displays it in the Finished section of your Account page.
- Automatically publishes the mock-up on your public profile page. By default, it will be publicly visible to other QuiltInk users.
You can later unpublish it if you don’t want it to be public. - Allows you to share it on the QuiltInk Wall, which can be the public Wall, community patterns Wall, or private room Wall, depending on the privacy settings of the pattern.
- Makes it available for other users to save as a favorite.
- Once saved as a finished mock-up, it cannot be directly modified in the future. If you want to make changes, you will need to duplicate it and work on the duplicated version.
2. Save as Draft: If you are still working on your coloring or want to make further modifications later, you can choose this option. It includes the following features:
- Saves the mock-up and displays it in the Draft section of your Account page.
- It will not appear on your public profile, and it cannot be shared on any QuiltInk Wall.
- Other users will not be able to see the draft mock-up, nor save it as a favorite.
- You can continue editing and refining the draft mock-up at any time
Manage your Mock-ups
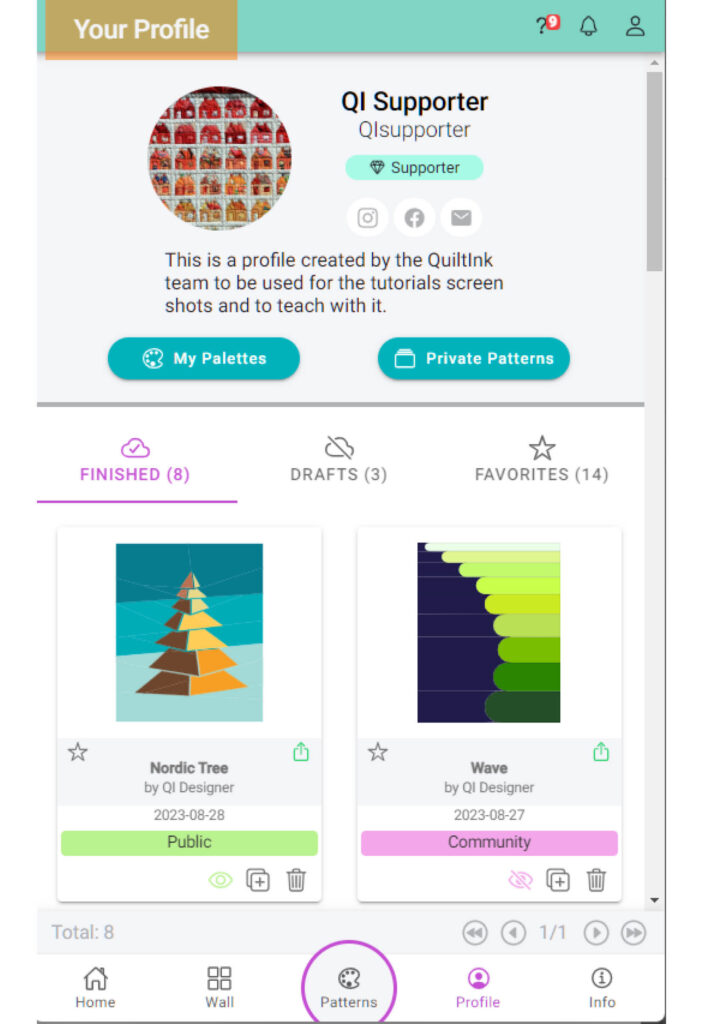
From the Private Profile page, all the users with an account can manage their saved mock-ups.
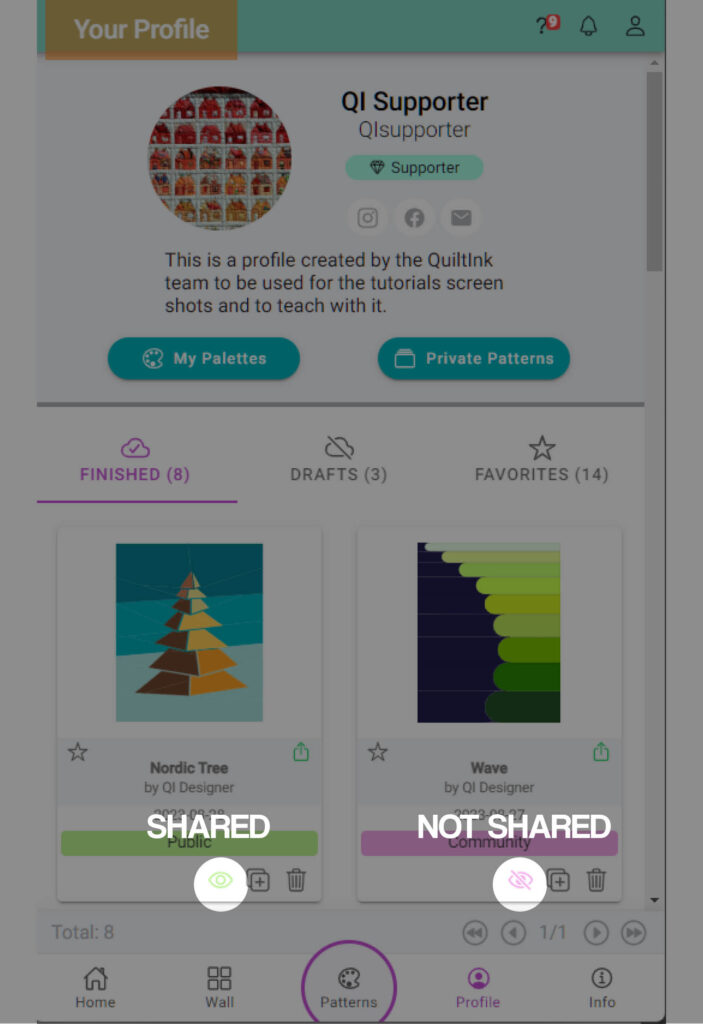
FINISHED
In the FINISHED tab you will find all the mock-ups you saved as finished, which can be shared with the QuiltInk community but not edited.
The number near the title indicated the number of Finished Mock-ups saved.
Each mock-up in the “FINISHED” tab displays a set of information and icons to help you manage them effectively:
- Pattern name: It indicates the name of the pattern from which the mock-up was created.
- Pattern designer: The name of the pattern designer is displayed, providing credit and recognition to the creator of the pattern.
- Date: The date on which the mock-up was saved is shown, allowing users to keep track of their colorings and plans.
- Mock-up type badge: A colored badge with a label identifies the origin of the mock-up. The badge colors and labels represent different types of mock-ups:
- “Public” + Green : Mock-ups from a public pattern that can be shared in the public profile page and public Wall.
- “Kit by XXXX” + Yellow: Mock-ups from patterns set up by Fabric Shops to be planned with their fabrics. The badge helps users remember which shop’s fabrics were used for the mock-up. These mock-ups can be shared on the public profile and public Wall.
- “Community” + Pink: Mock-ups from patterns accessible only to users with a specific code. They can be shared on the Community Wall only. If the designer later makes the pattern public, the mock-ups shared in the Community Wall will appear on the Public Wall.
- “Private Room” + Blue: Mock-ups from a private room the user is included in. These mock-ups can be shared into the Private Room Wall and if the designer activates the pattern to public, in the public Wall too, So, they have 2 “Eye” icons, the green/pink one is for Public/Community Wall and the blue one is for Private Room Wall.
- “Inactive” + grey: The pattern is in an inactive state either because the designer deactivated it or it hasn’t been activated yet, and the mock-up was created in a private room. You can still duplicate the mock-up and edit its colors, but it cannot be shared on the Public/Community Wall.
- “Disabled” + red: The pattern has been disabled because the designer no longer wants it available for coloring, or the designer has canceled their plan, and their patterns are no longer accessible for coloring on the platform. These mock-ups cannot be duplicated or edited in terms of colors; they can only be exported to review the colors used when creating them.
- “Eye” icon: This icon allows you to publish or unpublish the mock-up on its respective Wall, depending on the privacy level set for the origin pattern. If the eye icon is crossed, the mock-up will not be shown on the Wall. If the eye icon is not crossed, it will be visible on the Wall.
We encourage you to publish and share their mock-ups, as it allows you to showcase your amazing work and inspire other users. - “+” icon: Since finished mock-ups cannot be directly edited, you can duplicate them by clicking on the “+” icon. This creates a new draft based on the selected mock-up, which can be found in the “DRAFTS” section. You can then modify the duplicated mock-up or use it as a basis for creating a new one.
- “Trash” icon: This icon allows you to delete any unwanted mock-ups from their collection.
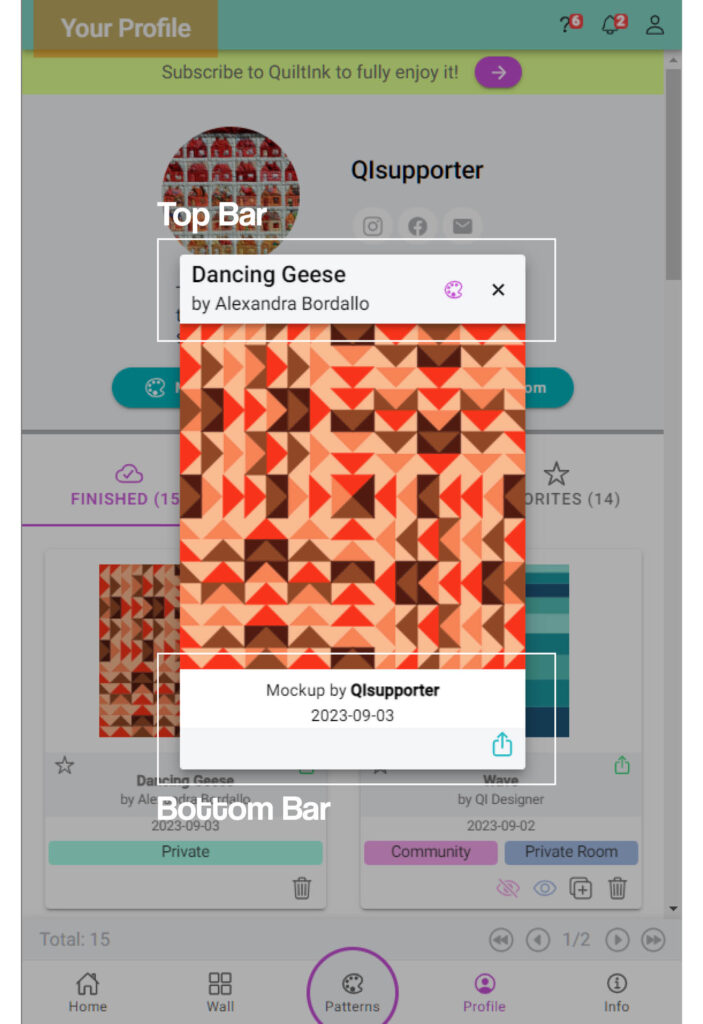
When clicking on a mock-up in the “FINISHED” section, a larger pop-up window will open, providing a closer and more detailed view of the mock-up. From this window, you can manage the following options:
At the Top Bar:
- “Palette” icon: By clicking the “Palette” icon at the top bar, you can access the coloring page of the pattern with the designer’s suggested color layouts for the pattern as basis. This allows creating a new mock-up of this pattern from the beginning.
- “Cart” icon: This will lead you to the designer’s website (or fabric shop’s website if it’s a Kits pattern), where you can find additional information about the pattern and potentially make a purchase.
- “Information” icon: Clicking the “Info” icon provides you with additional details about the specific pattern and the designer behind it. This gives you the opportunity to delve deeper into the inspiration, techniques, and background information related to the pattern and gain a better understanding of the designer’s work.
At the Bottom:
- Export: By clicking the “Export” icon it will generate an image of the mock-up along with the list of the colors/fabrics used or export just the image. You can use this exported image on social media platforms, or as a reference when cutting and sewing your quilt. For more detailed information on exporting mock-ups, refer to the “Export Mock-ups” tutorial.
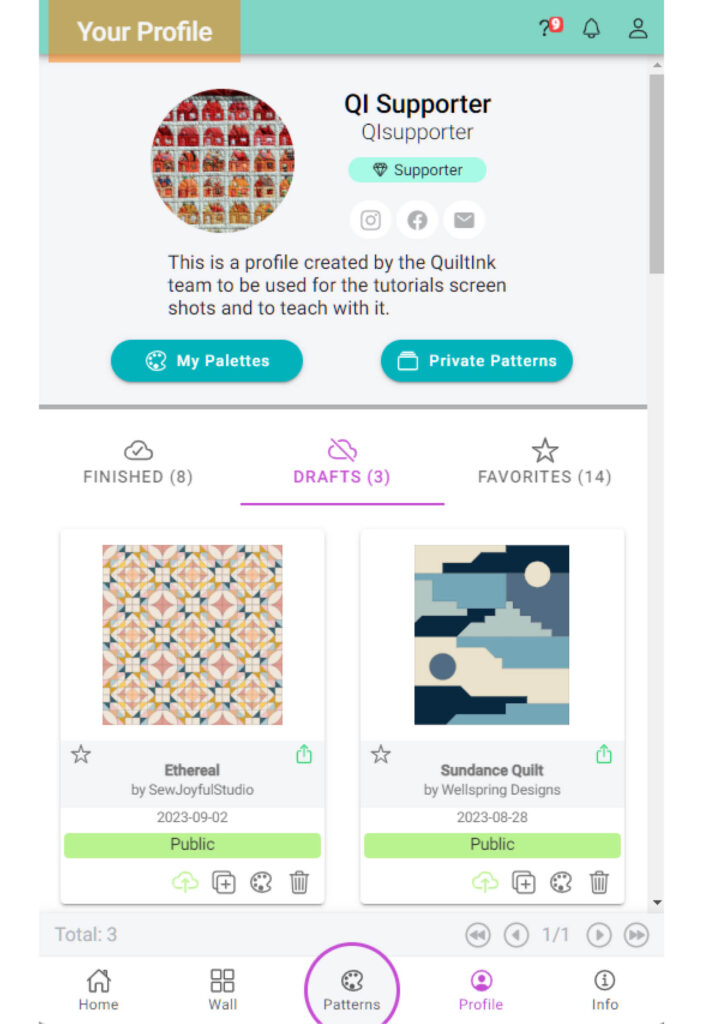
DRAFTS
In the “DRAFTS” tab, you will find your mock-ups saved as drafts, allowing you to continue coloring or make changes later.
The number near the title indicates the number of drafts you have saved.
Each draft includes the following information and options:
- Pattern name: It indicates the name of the pattern from which the draft was created, helping you identify the source pattern.
- Pattern designer: The name of the pattern designer is displayed, providing credit and recognition to the creator of the pattern.
- Date: The date on which the mock-up draft was saved is shown, allowing users to keep track of their colorings and plans.
- Mock-up type badge: A colored badge with a label identifies the origin of the drafts. The badge colors and labels represent different types of mock-ups, including those from public patterns, fabric shop kits, community patterns, and private rooms. These badges indicate the accessibility and sharing options for the patterns. They are the same as in the Finished mock-ups section.
- “Palette” icon: By clicking the “Palette” icon, you can access the coloring page of the draft. This allows you to continue coloring or change the colors of the mock-up. Once finished coloring, you have the following options:
- Save, Publish to Wall and Close: When you are satisfied with your draft and consider it complete, you can save it as a finished version. This will turn it into a finished mock-up and publish it on the Wall. It will no longer be editable as a draft.
- Overwrite Draft: If you want to continue coloring on another day or make changes in the future, you can choose to overwrite the draft. This allows you to keep the mock-up as a draft and make further modifications later.
- “Cloud” icon: Clicking this icon will turn a draft into a finished mock-up and publish it on the Wall. Once converted, you won’t be able to directly color it without duplicating it and creating a new draft.
- “+” icon: If you want to start a new mock-up based on the current draft, you can duplicate it by clicking the “+” icon. This creates a new draft with the current mock-up as a basis for further coloring.
- “Trash” icon: To delete any draft mock-up, you can click the “Trash” icon. This removes the draft from your drafts list.
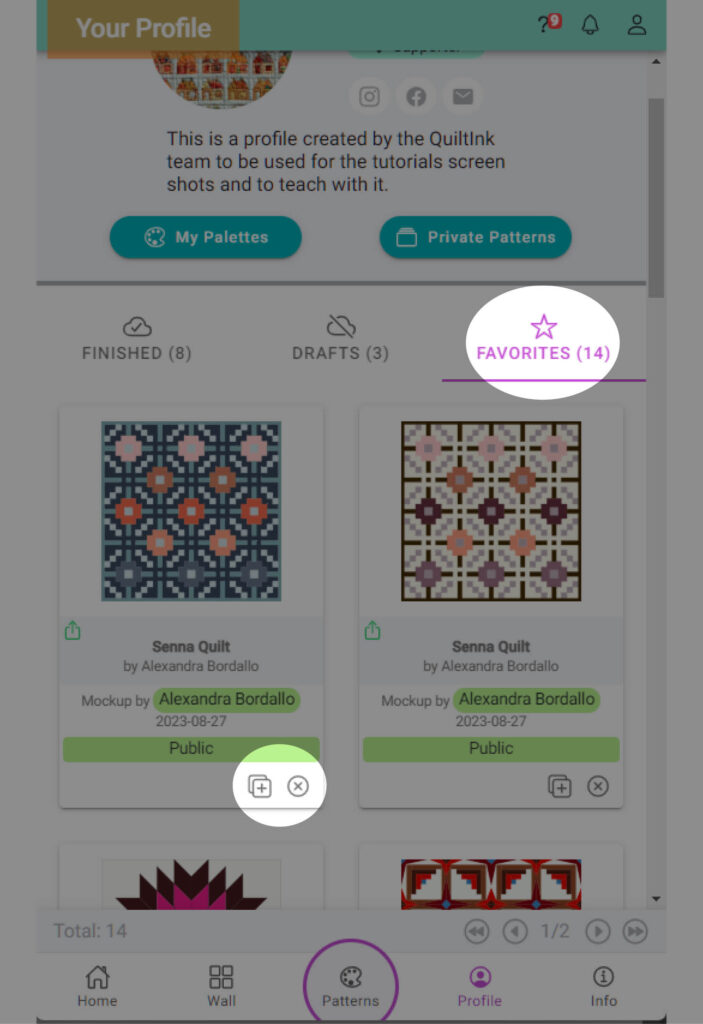
FAVORITES
In the FAVORITES tab will appear all the mock-ups made by other users and you clicked to its star in the Wall to save them as favorites.
The number near the title indicates the number of Favorite mock-ups you have.
Each mock-up in the “FAVORITE” tab displays a set of information and icons to help you manage them effectively:
- Pattern name: It indicates the name of the pattern from which the draft was created, helping you identify the source pattern.
- Pattern designer: The name of the pattern designer is displayed, providing credit and recognition to the creator of the pattern.
- Mockup creator: The name of the mock-ups creator is displayed, providing credit and recognition to the creator of the pattern.
- Date: The date on which the mock-up draft was created is shown, allowing users to keep track of their colorings and plans.
- Mock-up type badge: A colored badge with a label identifies the origin of the drafts. The badge colors and labels represent different types of mock-ups, including those from public patterns, fabric shop kits, community patterns, and private rooms. These badges indicate the accessibility and sharing options for the patterns. They are the same as in the Finished mock-ups section.
- “+” icon: If you want to create a new mock-up based on this one you can duplicate it. But clicking the “+” icon will create a new Draft with this mock-up as a basis to start coloring.
- “x” icon: To remove this mock-up from your favorites. This option won’t remove the mock-up which is created by another user, it will remain in the public Wall.
When clicking on a mock-up in the “FAVORITES” section, a pop-up window will open, providing a closer and more detailed view of the mock-up. This larger window will allow you the same options as in the Finished section: Color the original pattern, visit designer website (or fabric shop’s website if it’s a Kits pattern), check pattern/designer info and export.
If you want to create your own mockups based on a Favorite one or just check the colors used by the mock-up creator, you can duplicate this mock-up to create a draft and by opening the coloring page of this draft you will be able to modify the colors/fabrics and check the ones originally used. You can also export this mock-up and check the colors/fabrics list at the exporting page.
If you have any questions or concerns related to managing your mock-ups or any aspect of using QuiltInk, we are here to help. You can reach out to us via email at info@quiltink.com or through the chat on our Instagram platform (@quilt_ink).