
FromQuiltInktoReality: Astra
STOP and look!
July 9 is the beginning of the Astra Quilt SAL by Zahm Co and we want to celebrate it with this stunning #fromquiltinktoreality post.
Join Katie for a fun six-week quilt sew-along from July 9 to August 13, 2022. They will meet locally at Wooden Spools every Saturday morning (9-10 am MDT).
If you are not in the Denver area you can join them virtually (email or Instagram); everyone is welcome!
By signing up, you’ll receive weekly emails filled with Astra quilt knowledge, sewing how-tos, and PRIZES!
Don’t miss it and start planing your Astra quilt with QuiktInk!!
Be part of the QuiltInk Community!
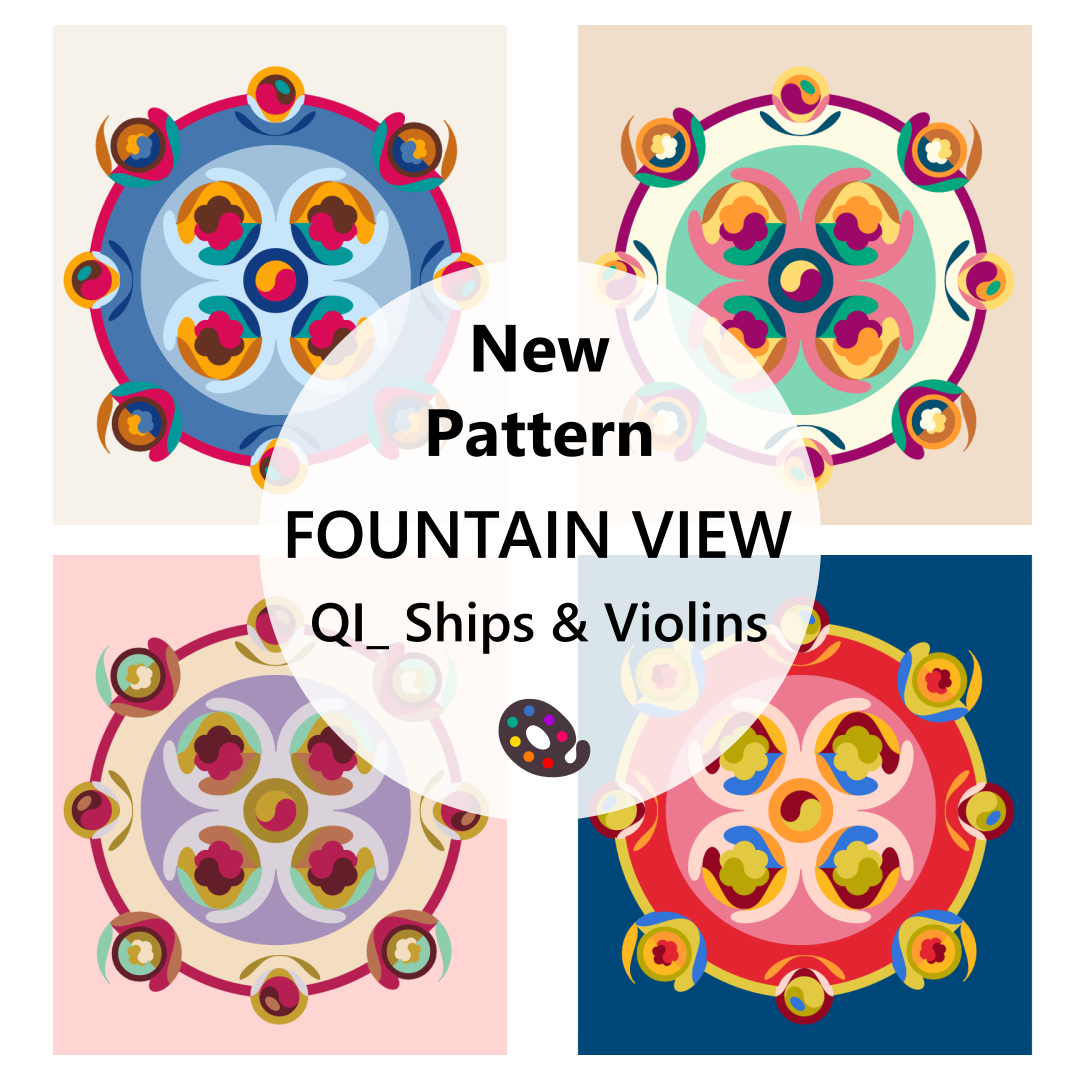
Title: Fountain View
Designer: Ships and Violins
Technique: Traditional piecing & Appliqué
Sizes: 3
Colour Layouts: 2
New pattern in QuiltInk!
Cristina, from Ships and Violins, is releasing the amazing Fountain View #quilt #pattern . She has activated it in QuiltInk for you to start planning it!
Fountain View is a traditionally pieced and appliquéd quilt pattern. The original design is a modern take on a medallion layout. The name was inspired by the aerial view and colours of the cover design, which evoke a fountain adorned by sculptural elements. It comes in 3 sizes: Pillow, Baby and Throw, and it’s full of colour possibilities!
For more info or to purchase a pattern, visit www.shipsandviolins.com
And don’t forget to share your colour versions!!
We can’t wait to see them all!
Music: “Royalty Free Music from Bensound“
A lot of fun in the QuiltInk Wall with all the gorgeous new patterns activated these last weeks.
The #QInkMockupMonday number 16 include 72 colour versions from the last week in the QuiltInk made from 17 quilt patterns!
Use QuiltInk during your holiday to plan your next project! In teh beach, in the pool or in the mountain!
Register (free) + Colour + Share in the QuiltInk Wall!
Be part of the QuiltInk Community!
Music from Uppbeat (free for Creators!):
https://uppbeat.io/t/infraction/ultraviolet
License code: JW2FALDYCS5UKL2J
——————————–
Discover more music and suppor music creator at Uppbeat.

Title: Sky Cabin Quilt
Designer: Toad and Sew
Technique: Traditional piecing
Sizes: 5
Colour Layouts: 2
The Sky Cabin Quilt is just released by Taylor from Tad and Sew and ready on QuiltInk for you to make as many color versions you can imagine before start seeing it!!
The Sky Cabin is a modern interpretation of the log cabin block. It is an advanced beginner and block based pattern. The pattern comes with two different size blocks making a lot of different size options: Wall hanging, Baby, Throw, Queen and King! It’s also a great pattern to master HRTs, HSTs, and matching points.
Don’t miss the SAL coming this month!
For more info and get your copy of the pattern visit Taylor’s website or @toadandsew at Instagram and show her a lot of love!!
Remember to register (free) and share in the QuiltInk Wall and social media your mockups!
Be part of the QuiltInk community!
Music: “Royalty Free Music from Bensound“
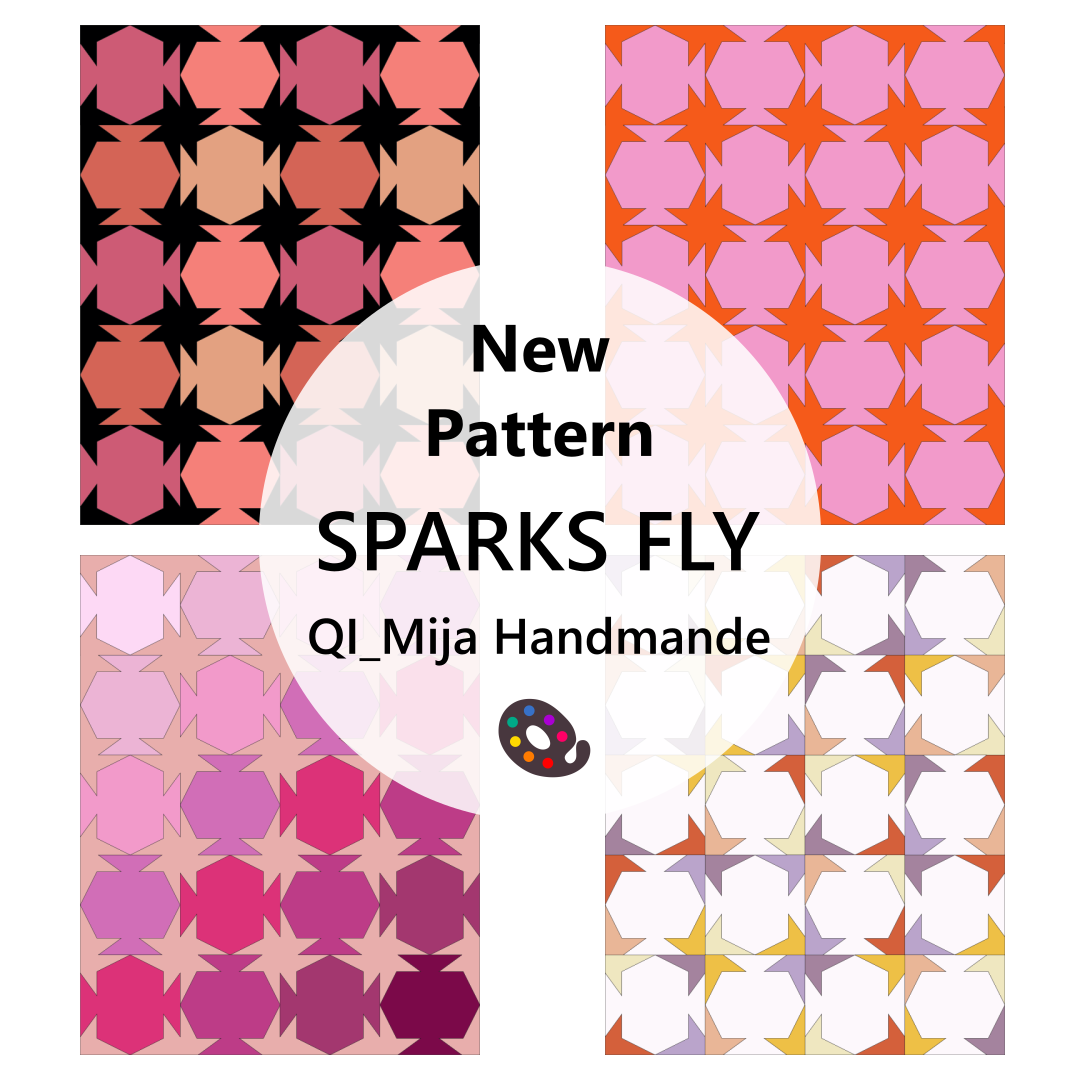
Title: Sparks Fly
Designer: Mija Handmade
Technique: Traditional piecing
Sizes: 4
Colour Layouts: 8
Let’s celebrate all together!! Keep reading! There is a big prize!!!
Quiltink has a new designer, Erin Nichole fromMija Handmade with her Sparks Fly Quilt pattern, and more coming really soon!! And she is celebrating she has just reached 3000 followers in instagram with a really fun Giveaway!
To participate and to have the chance to win a copy of the Sparks Fly digital quilt pattern and a $150 gift card to Tree House Quilting Co! You have to:
1.Make sure you’re following @mija.handmade and @treehousequiltingco in Instagram.
2.Color the Sparks Fly Quilt in QuiltInk. Check Erin’s IGTV video tutorial.
3. Share your mock up to Instagram (to your stories or as a post) and tag Erin so she can see it!
Hurry up!! Erin will announce the winner on July 1th!
The new Erin Nichole’s pattern, the Sparks Fly, is a blocked-based, funky and geometric quilt top. Showcase your favorite prints in the mid-mod shapes version or pull from your favorite fat quarter bundle (or scraps!) to make the scrappy star version. Looking for something a little more traditional? The two color version is a nod to more traditional quilts, but with a modern sense of scale and movement. The quilt comes in 3 different color ways and 4 different sizes!
We can’t wait to see all your colour versions of the Sparks Fly!!
Be part of the QuiltInk Community!
Music: “Royalty Free Music from Bensound“
A new #QInk_MockupMonday is here!
62 colour versions from 25 patterns, made by the QuiltInk Users during the last 2 week!!
Enjoy this pure colour inspiration and be part of it by publishing your color versions in the QuiltInk Wall!! We can’t wait to see them all!!
Music from Uppbeat (free for Creators!):
https://uppbeat.io/t/all-good-folks/playtime
License code: GHZUSZW8ATPIUPQ4
——————————–
Discover more music and suppor music creator at Uppbeat.
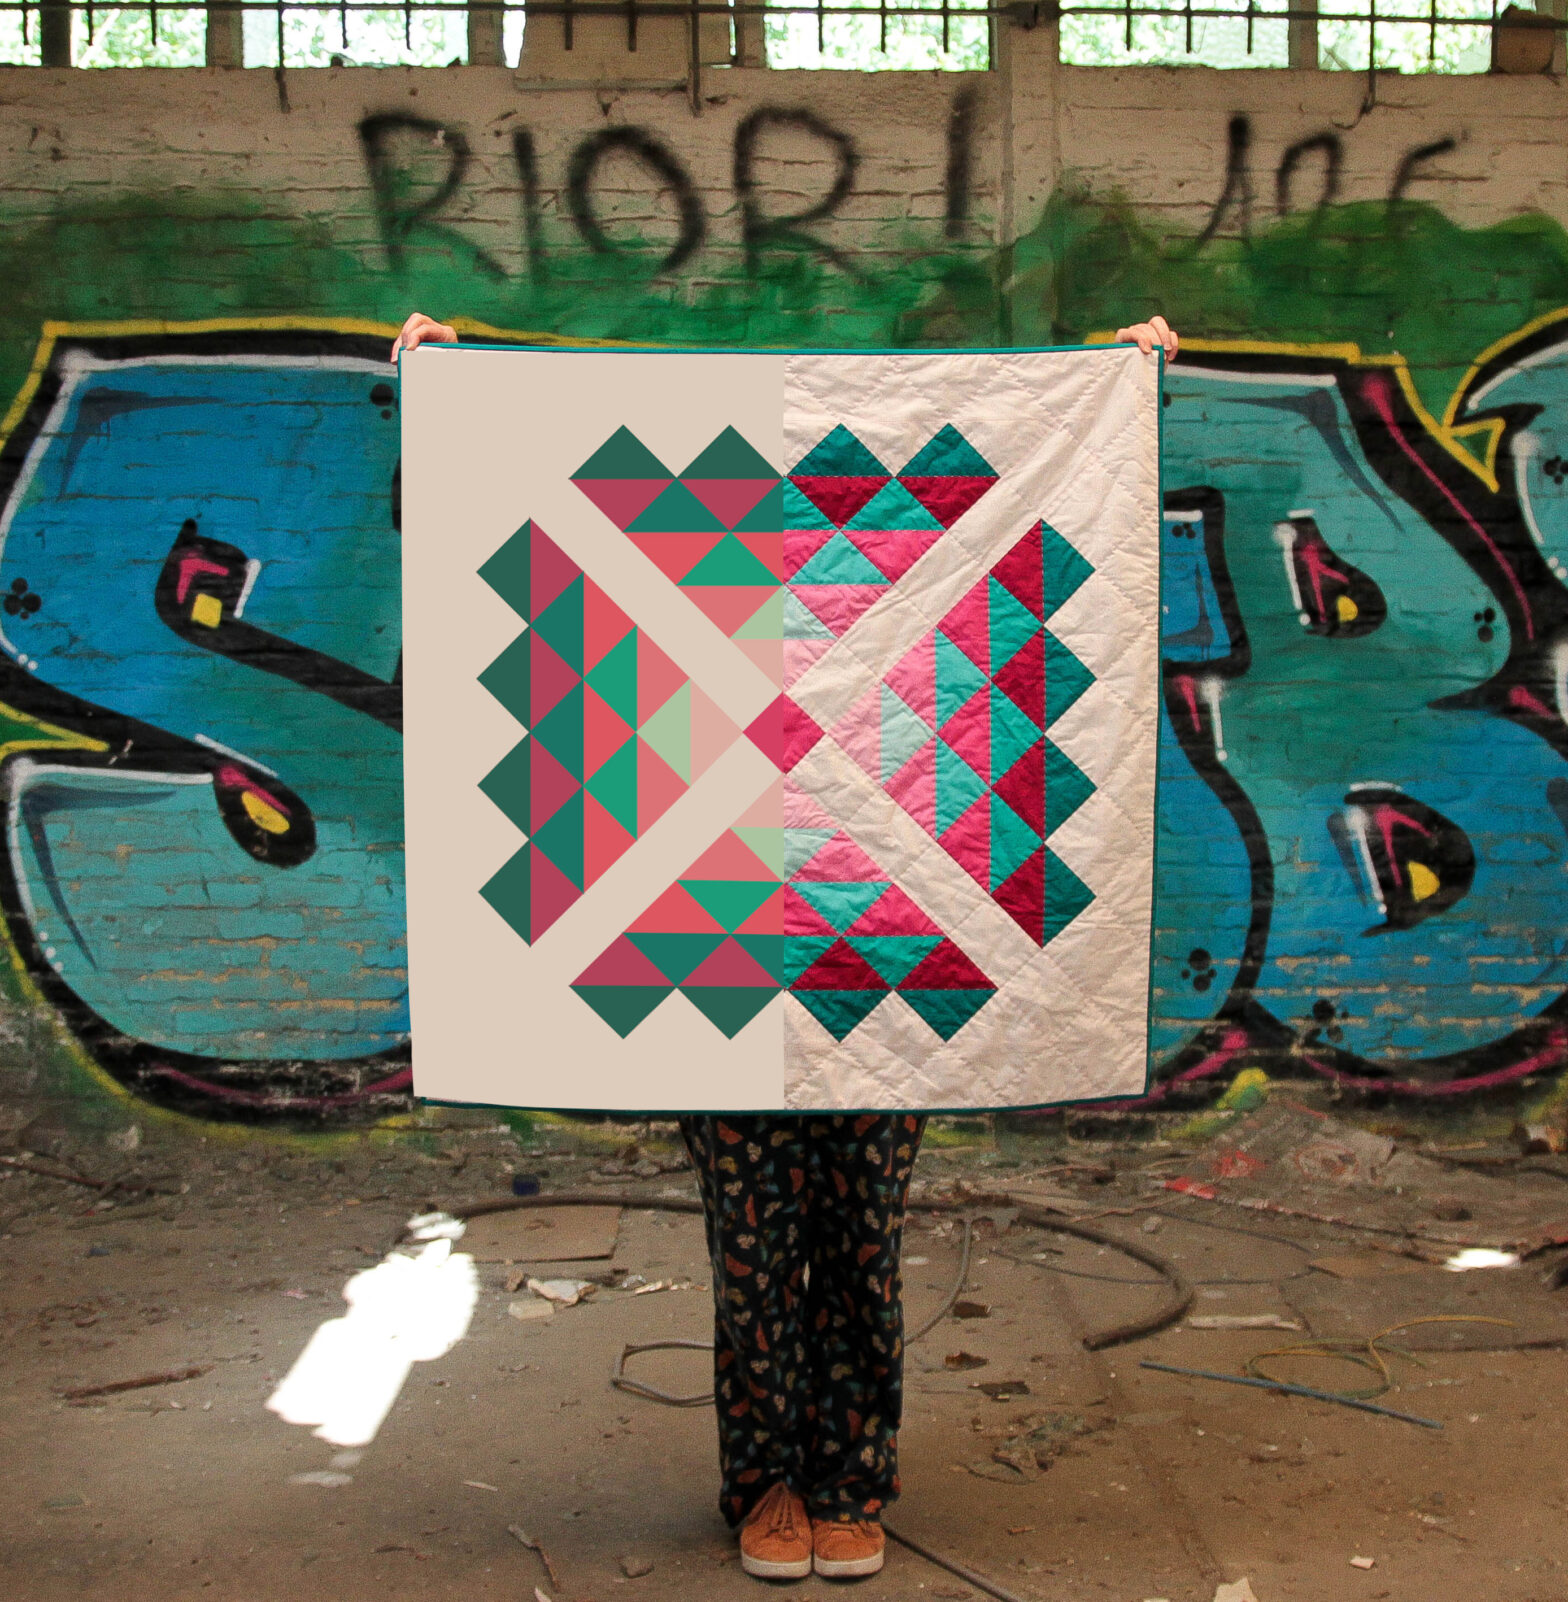
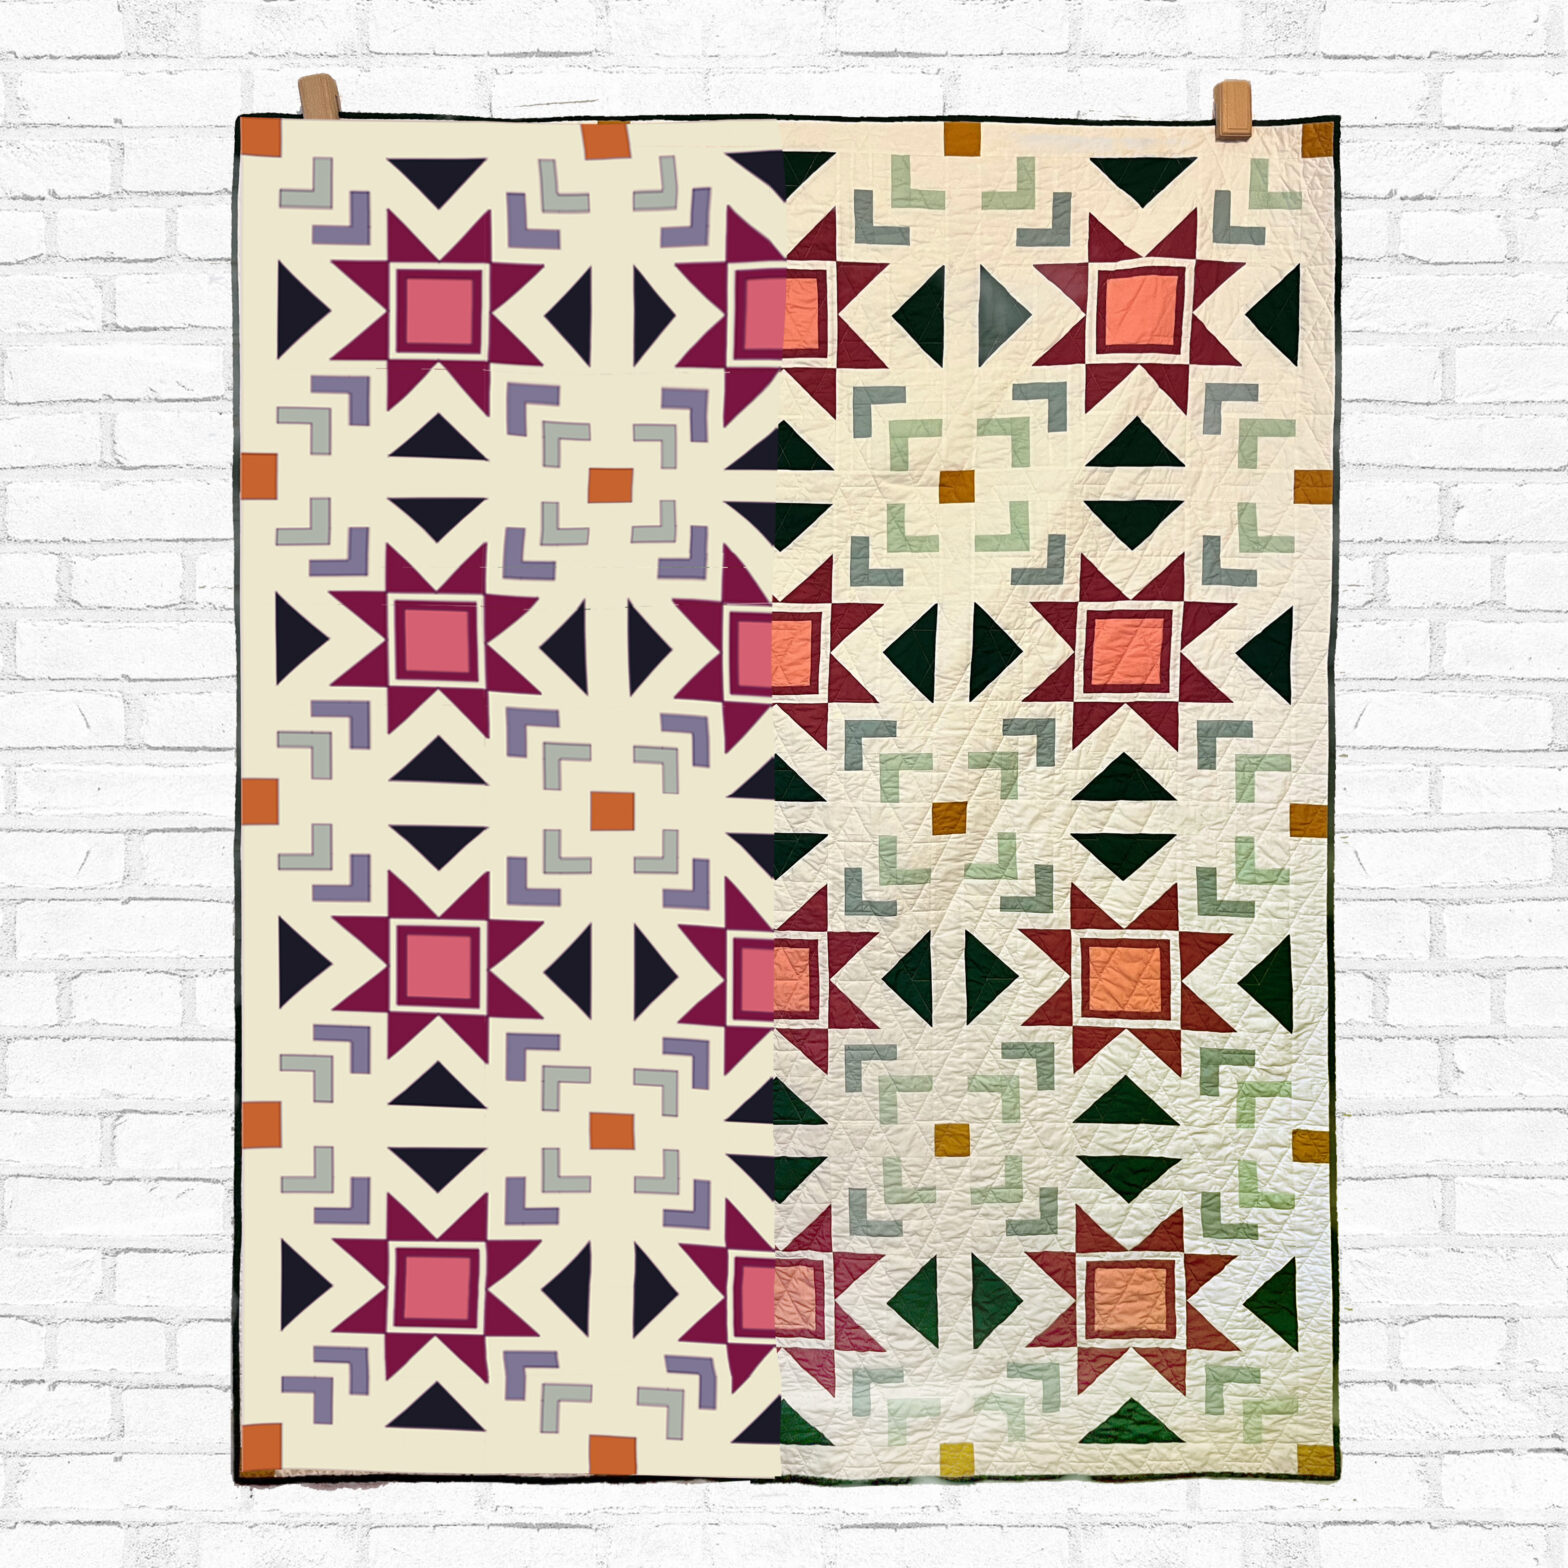
Last 24 June was the release of the Whistle Stop pattern by Tessellate Textiles, and we celebrated it creatinf this amazing 50-50 image, #fromquiltinktoreality!!
This amazing quilt is sewn by Daphne (@octopurse) a #quiltaddict, that uses Quiltink to create really amazing quilts.
Get your copy of the pattern at Tessellate Textiles website and plan it with QuiltInk!#

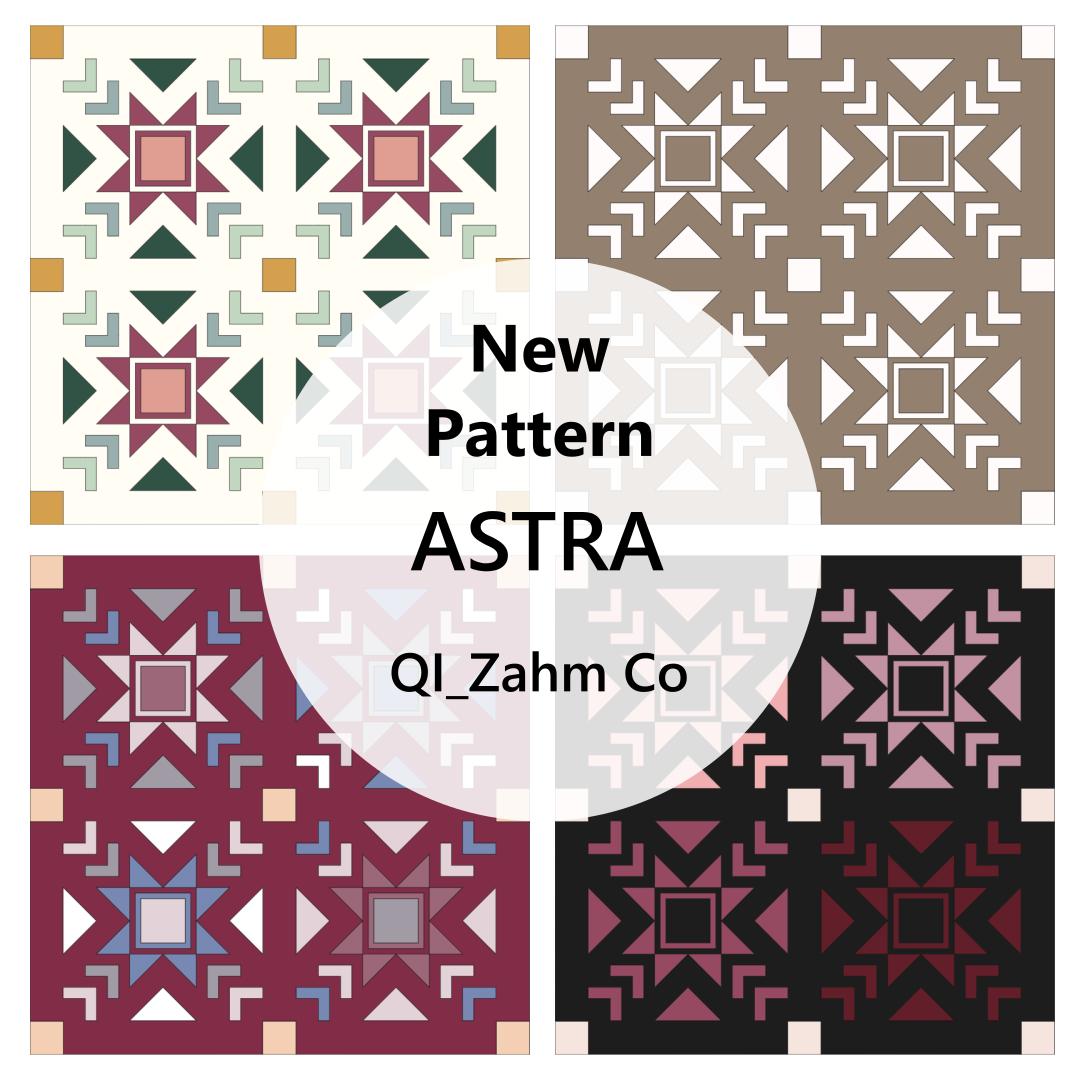
Title: Astra
Designer: Zahm Co
Technique: Traditional piecing
Sizes: 4
Colour Layouts: 10
New designer and new pattern in QuiltInk!
Today is the big release of the Astra Quilt pattern by Katie, from Zahm Co! She has placed the pattern on QuiltInk for you to plan it. And we are really excited to host it!!
The Astra Quilt pattern is inspired by the rare conjunction of Jupiter and Saturn. Sawtooth star is the center piece and Katie’s favorite block. Astra means to the stars.
The pattern comes in 4 sizes: Pillow, Baby, Throw & Bed and it is confident beginner. Visit Katie’s profile, website blog posts & youtube video for more info and support.
You can use ASTRA15 for 15% off all patterns and stickers in the shop!!! And don’t miss the SAL starting on July 9th!
It’s a pattern with endless color possibilities and we can’t wait to see all your colour versions in the QuiltInk Wall and social media! Tag us and we will repost!!
Be part of the QuiltInk Community!
Energize your day with the 14th #QInkMockupMonday in honor of the most versioned pattern in QuiltInk!
The Glitter Ball BOM by The Crafty Nomad is the pattern with more colour versions in the QuiltInk Wall with 307 unique project plans made by the QuiltInk users!
The pattern was placed in QuiltInk 6 month ago when the BOM started and you can join them til the end of July. For more info visit The Crafty Nomad website!
Be part of the QuiltInk Community!
Register (free) + Colour + Share in the QuiltInk Wall!
Music: “Royalty Free Music from Bensound”
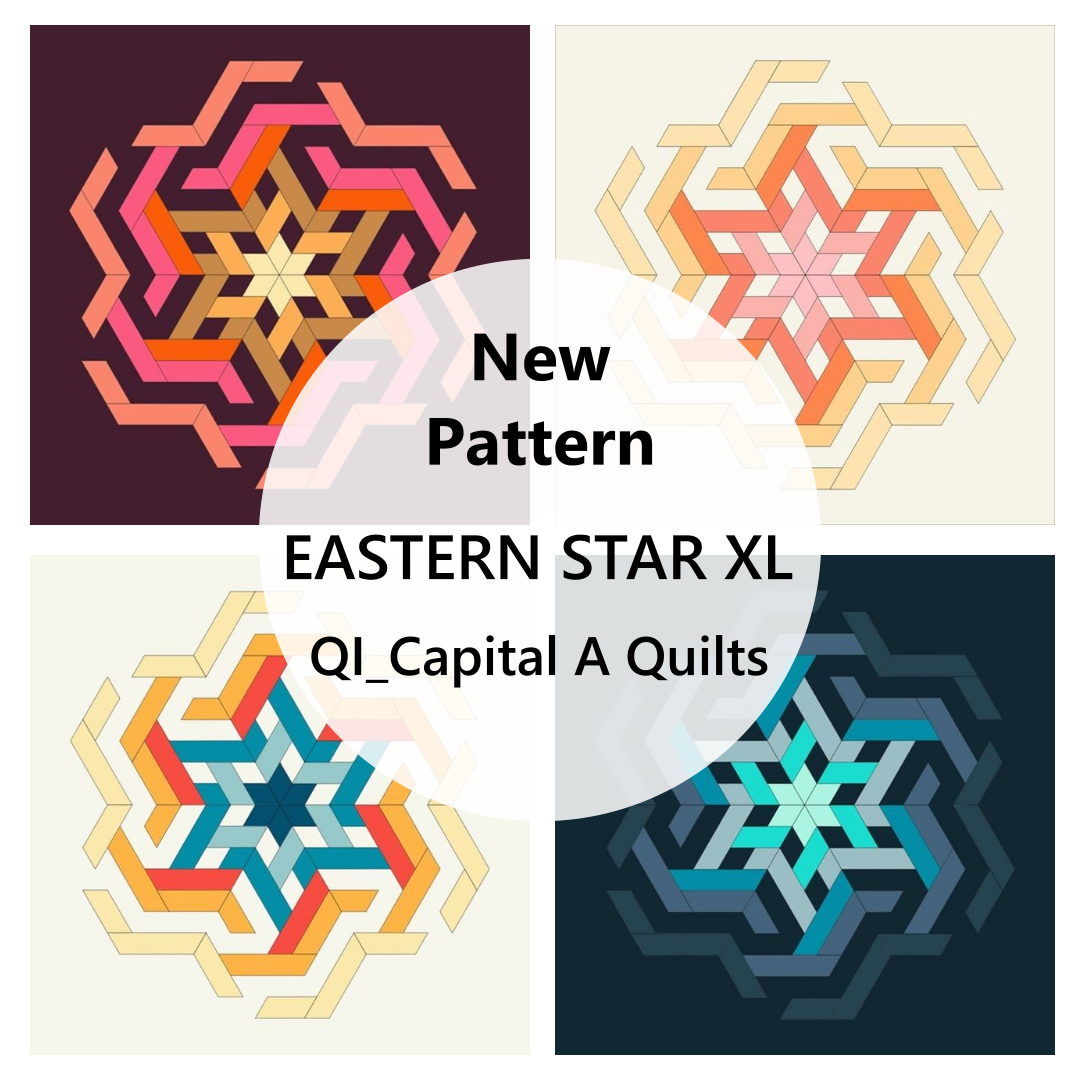
Title: Eastern Star XL
Designer: Capital a Quilts
Technique: Traditional piecing with templates
Sizes: 6
Colour Layouts: 6
A new gorgeous design by Auguto from Capital A Quilts has been just released and you can digital plan yours with QuiltInk!!
Eastern Star is a design that came about by deconstructing a traditional Lone Star Quilt and is inspired by Muslim architecture. It is a an advanced beginner pattern that uses parallelograms and trapezoids and it comes in 6 different sizes.
For more info about the pattern visit Capital A Quilts website.
Be part of the QuiltInk Community!
Register (free) + Colour + Share in the QuiltInk Wall!
Music: “Royalty Free Music from Bensound“