Fabric Requirements option
The fabric requirements feature in QuiltInk is a powerful tool that enhances the overall quilting experience. This option allows designers, fabric shops, and users to easily keep track of how much fabric is needed for any project. Instead of manually check the fabric needed from the pattern, users can view accurate fabric amounts directly from the platform, making the quilting process more streamlined and efficient.
Fabric shops now have the ability to check and add fabric requirements to patterns in QuiltInk, a feature that significantly enhances your workflow and customer experience. By taking advantage of this tool, you can streamline the process of creating kits, bundles, and mock-ups for your customers.
This feature is valuable for fabric shops for several reasons:
Simplifies Kit Creation: By adding fabric requirements directly to the patterns, fabric shops can quickly create kits and bundles, saving time and effort.
Improves Customer Experience: Providing clear fabric requirements makes it easier for customers to purchase the exact fabrics they need, leading to a smoother shopping experience and fewer questions about the patterns.
Increases Sales: When fabric requirements are included, customers are more likely to buy all the materials they need from your shop in one go, boosting fabric sales.
Offers Flexibility: Shops can adjust the fabric requirements to fit their stock and precuts, offering more tailored and attractive kit options for customers.
Enhances Pattern Value: By adding fabric requirements, even if the designer hasn’t done so, you’re increasing the usability of the pattern, which can drive more engagement and sales for both your fabrics and the patterns.
Fabric shops can add or modify fabric requirements in the following areas within QuiltInk:
Kits: Add or adjust the fabric requirements when creating Kits in QuiltInk.
If a pattern doesn’t already have fabric requirements added by the designer, or if you’d like to adapt them to fit your shop’s needs, you can easily do so while setting up Kits with any pattern in QuiltInk.
Mock-ups: Add fabric requirements to any mock-up on the platform.
Want to create a mock-up of a pattern where the designer hasn’t included fabric requirements? Now you can! This ensures that you can always create your mock-ups knowing the fabric requirements needed.
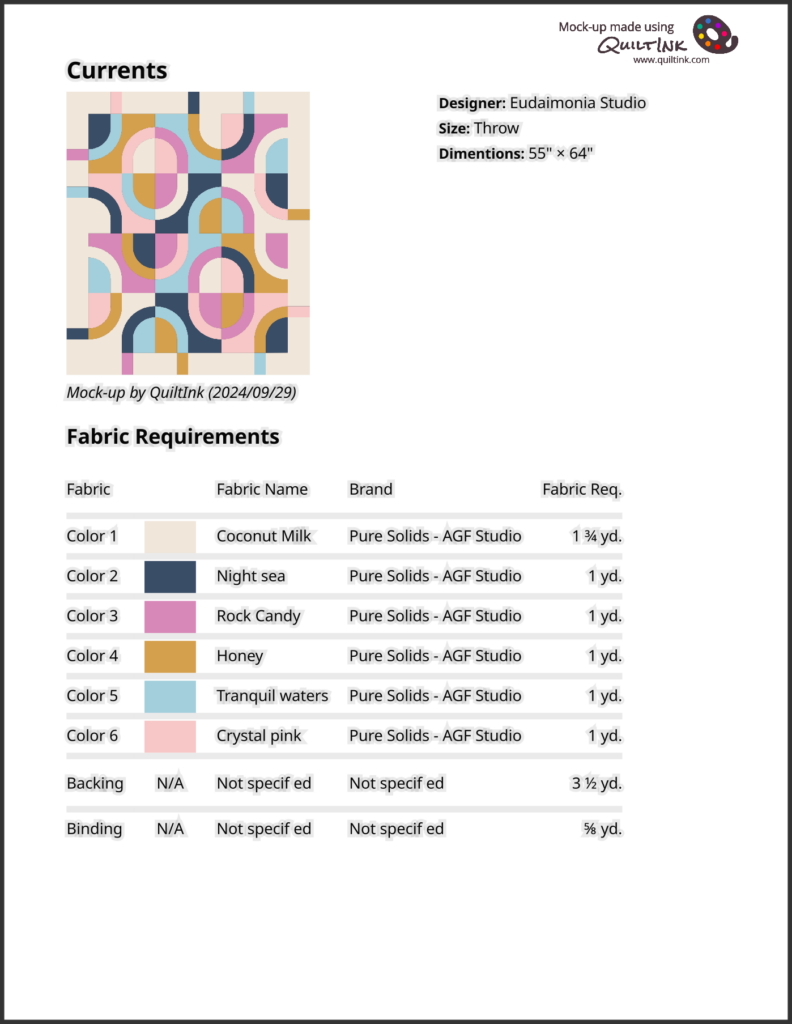
Currents Quilt by Eudaimonia Studios
How to add the Fabric Requirements
Adding fabric requirements to your Kits or mock-ups is an easy process at the coloring page. You can also apply this to all already active Kits in QuiltInk. Follow these simple steps:
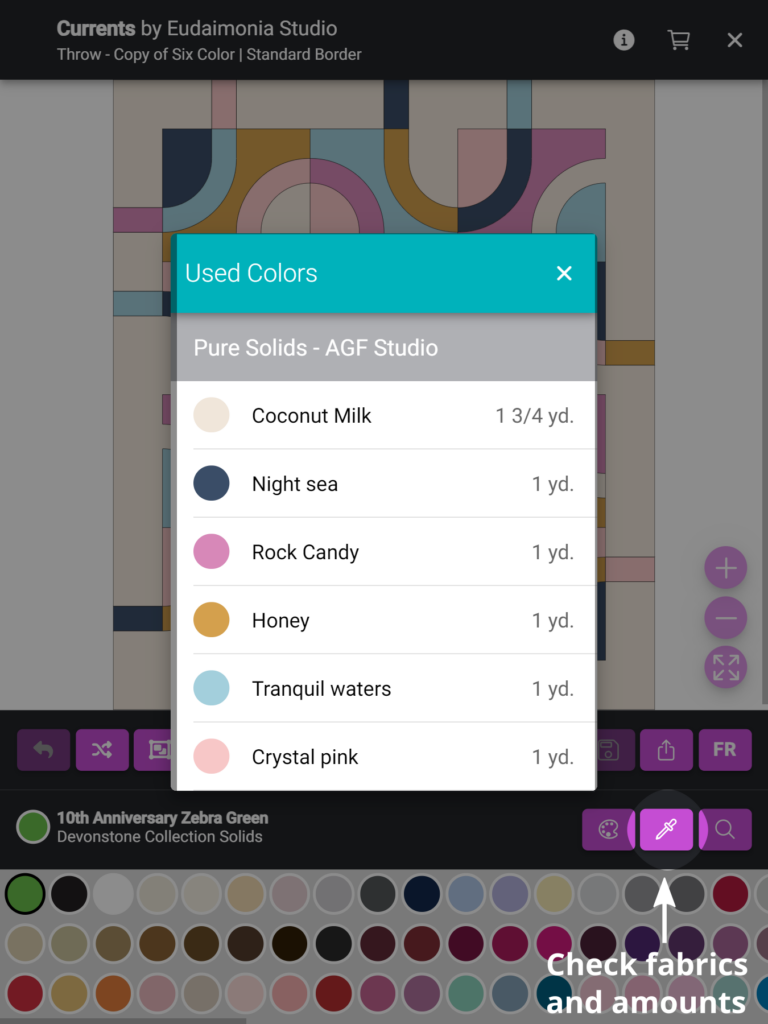
1. Finish Coloring: After completing a finished color layout in the Kits or any mock-up, check the colors used via the drop-picker icon. Ensure you have used the desired colors and removed any extras that you didn’t plan to include.
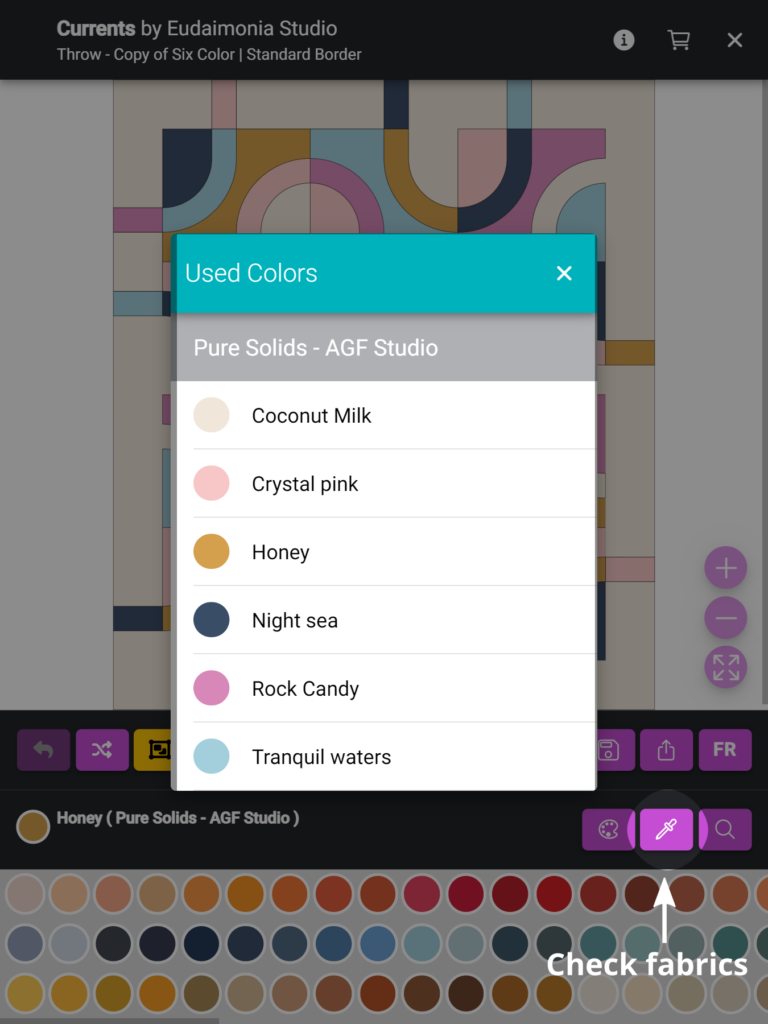
2. Merge the Pieces by Color: Click the icon to merge the pieces by color.
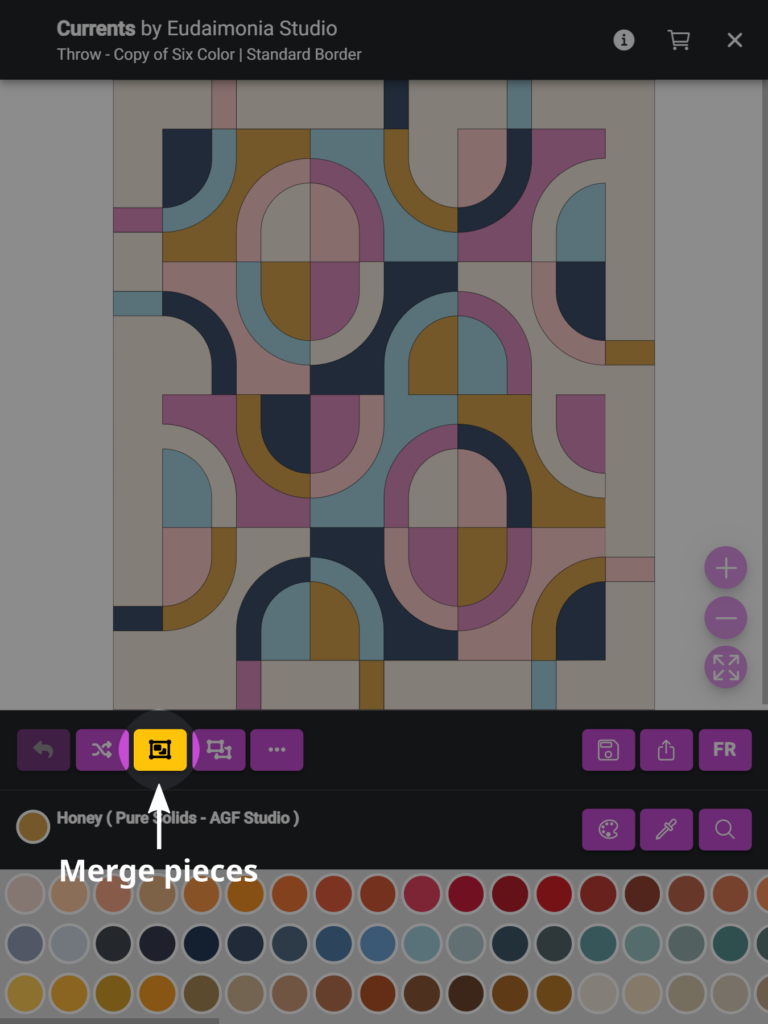
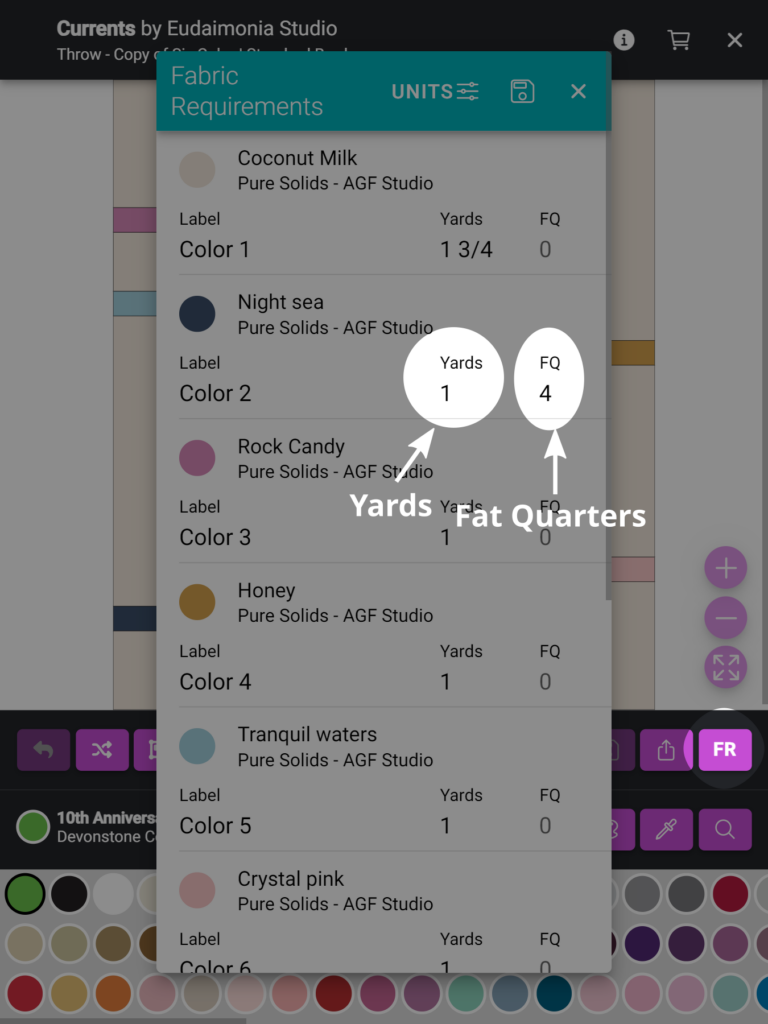
3. Click the “FQ” icon: This icon allows you to input fabric requirements for each color/fabric.
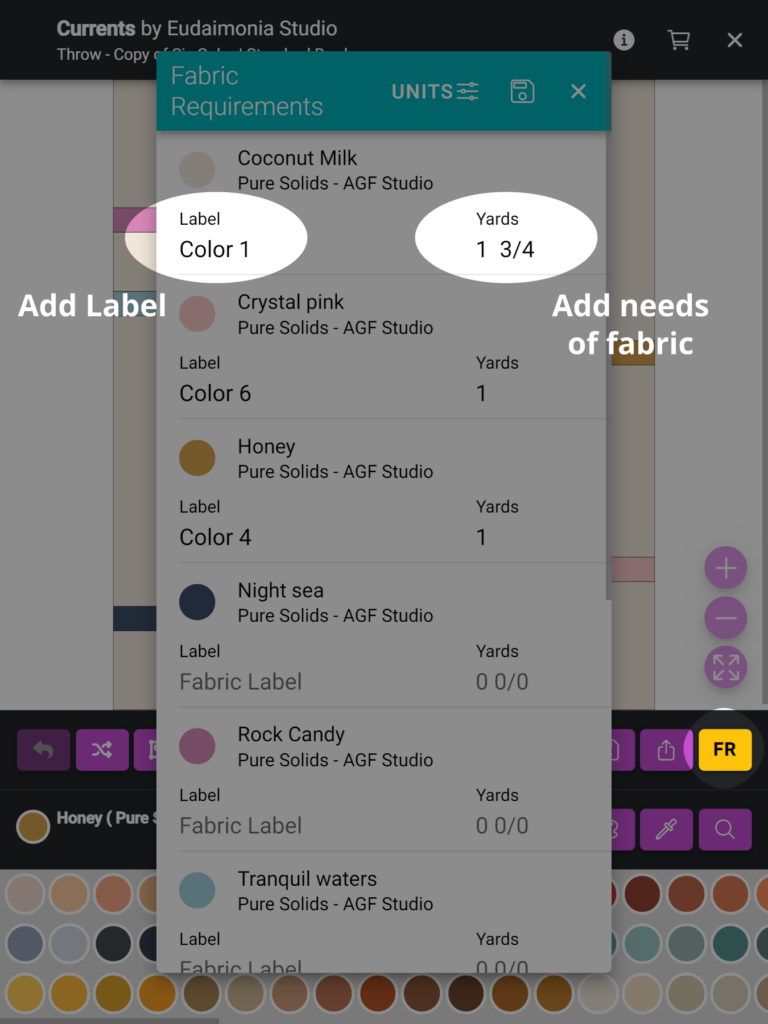
4. Add Labels and Amounts: For each color/fabric, add the appropriate labels and the amount of fabric needed.
NOTE: The fabric requirements should be added in the following format:
Number + space + Fraction (X/X)
For amounts less than one yard, use this format:
0 + space + Fraction
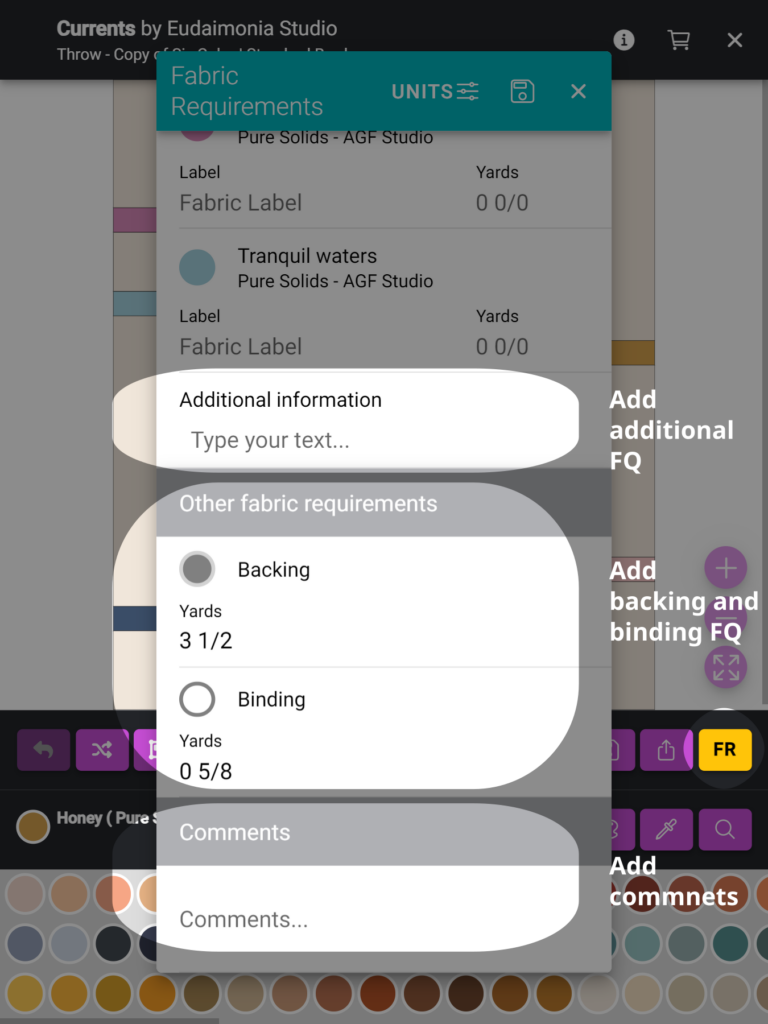
5. Add Specific Requirements: In the field below the fabrics, you can add specific requirements, such as the total number of Fat Quarters needed, for example.
6. Include Backing and Binding Needs: Don’t forget to specify any backing and binding fabric requirements for this size of the patten.
7. Add Important Comments: In the fields at the bottom, include any relevant comments about the fabric requirements, such as: Width of Fabric (WOF); whether it’s for directional fabrics; if the fabric requirements are adjusted or have a little room, etc.
By following these steps, you can ensure that your patterns in QuiltInk provide clear and accurate fabric requirements, enhancing the experience for users!
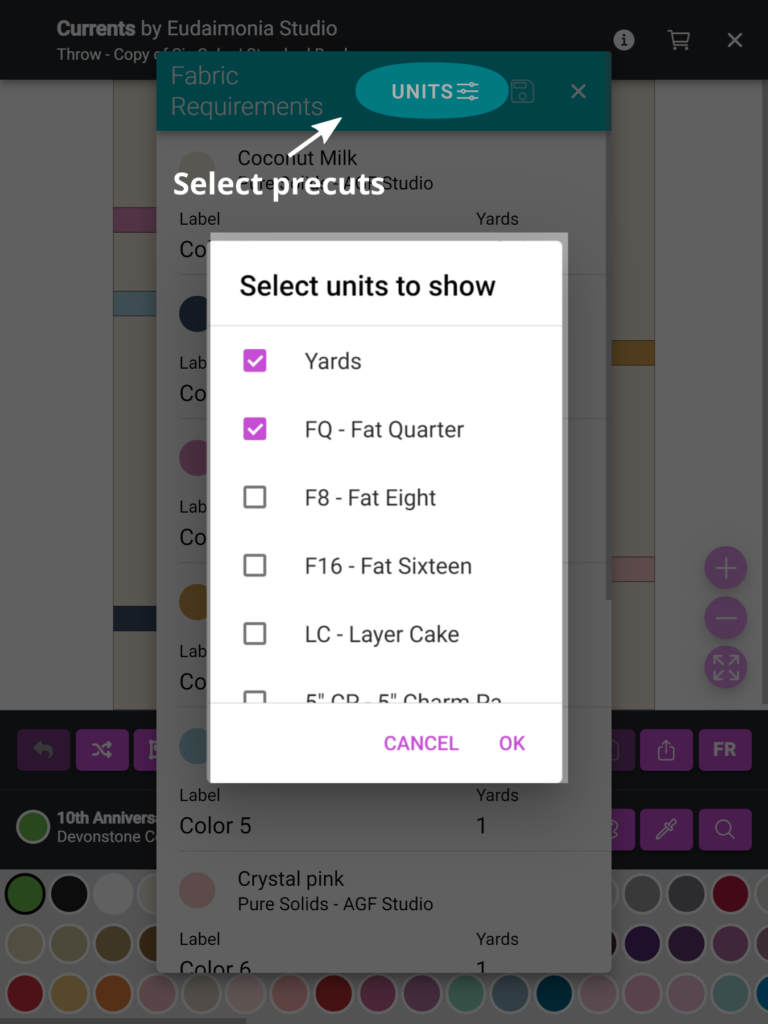
9. QuiltInk allows you to add fabric requirements not only in yards but also using precuts. To do this:
- Select the UNITS Icon: At the top bar, click the UNITS button to switch from yards to precuts.
- Choose Precuts: From the list, select the precuts you want to use. Available options include: Fat Quarter (FQ); Fat Eighth (F8); Layer Cake (LC); Jelly Roll (JR); and more
- Select Multiple: You can choose several yards and precut options at the same time.
Add Amounts: For each selected yards/precut, add the appropriate amount required for the pattern.
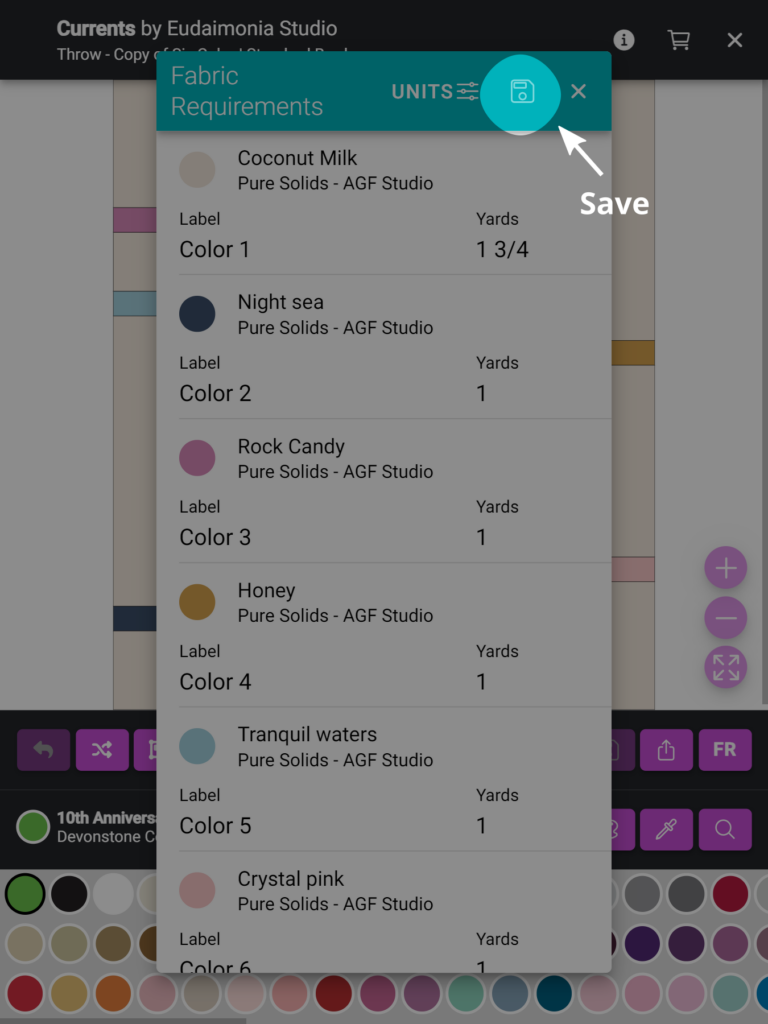
6. Save. Click the disk icon to save the fabric requirements added.
CHECK THE FABRIC REQUIREMENTS
After adding the fabric requirements, it’s important to verify that everything is displayed correctly. Follow these steps:
1. Check the Drop-Picker Icon:
- Open the drop-picker icon on the coloring page.
- Ensure that all fabrics, labels, and amounts are displayed correctly.
- Confirm that the colors and labels match the fabrics you intended to use.
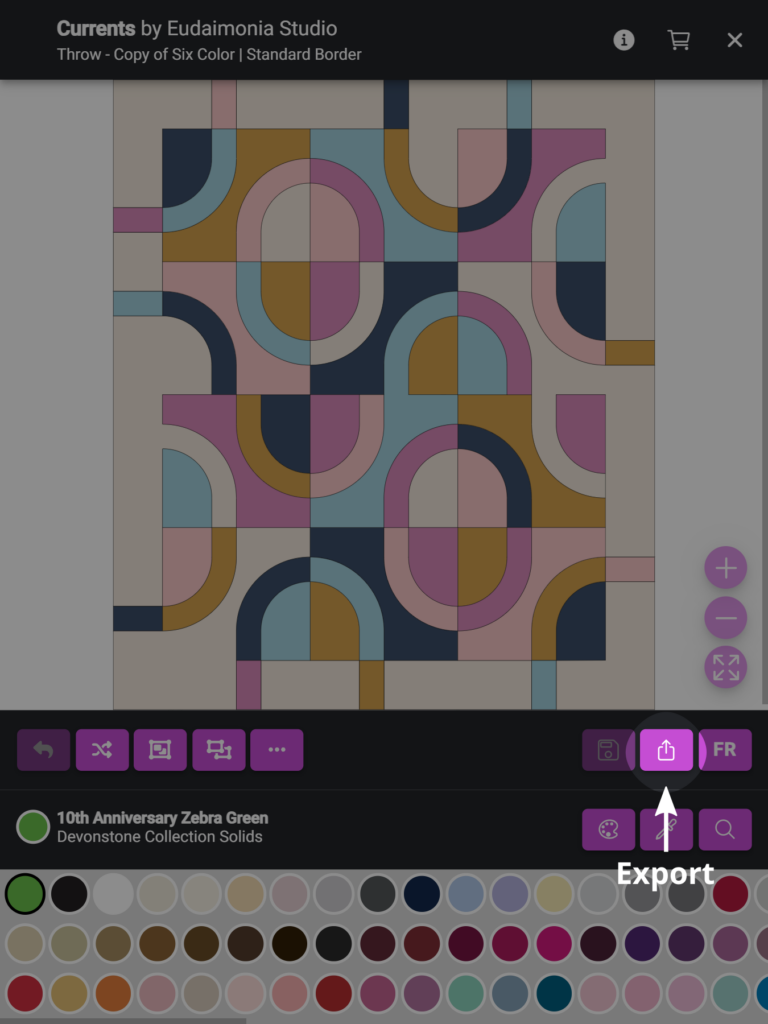
2. Verify the Exporting Sheet:
- Open the exporting sheet for the pattern.
- Check the list of all fabrics to ensure accuracy.
- Confirm that the backing and binding fabric requirements are correctly displayed.
- Review any comments you added (e.g., WOF, directional fabrics, etc.) to make sure they appear as intended.
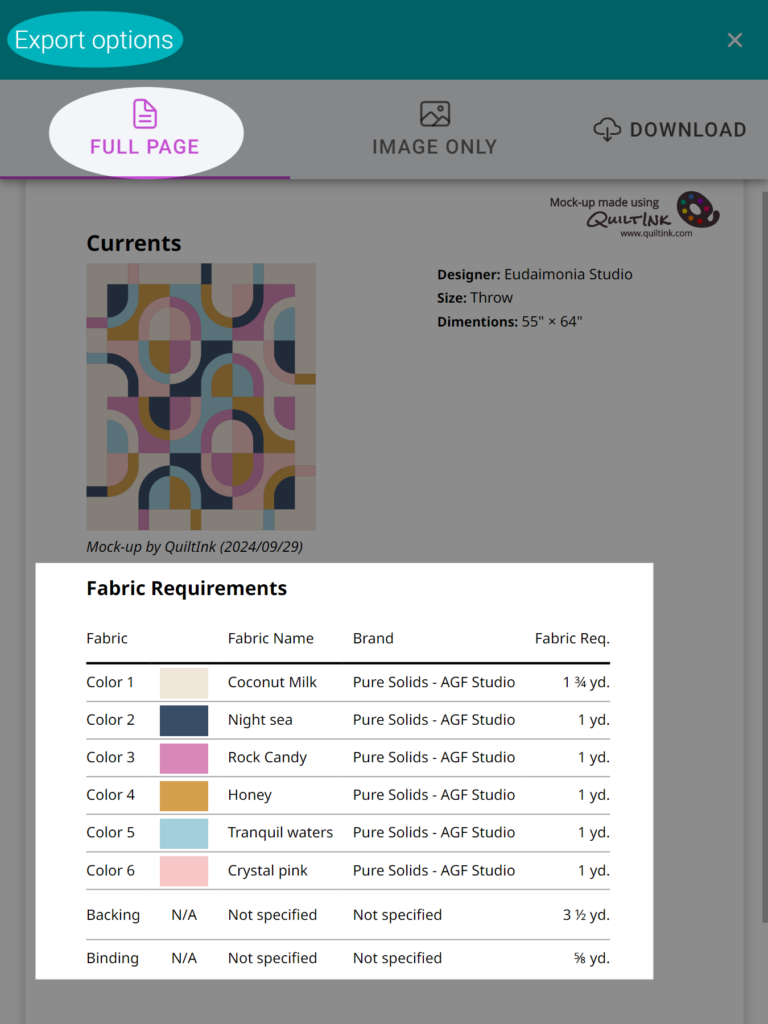
By reviewing these areas and reaching out if needed, you can ensure that the fabric requirements have been properly added to your pattern.
Multiple mock-ups with FQ
Here is the process you need to follow to maximize the fabric requirements usage when coloring a pattern without fabric requirements added by the designer, and you don’t want to create a Kit for it.
This process will allow you to create as many mock-ups as needed for a pattern where the designer hasn’t added fabric requirements, without having to add them to each mock-up individually.
1. Create a new mock-up.
2. After finishing coloring all the pieces, add the fabric requirements as explained int he previous section.
3. Save the mock-up as a finished one or as draft.
4. Go to your profile page and locate the mock-up, at the Finished or Drafts tabs.
5. Duplicate the mock-up by clicking the “+” icon.
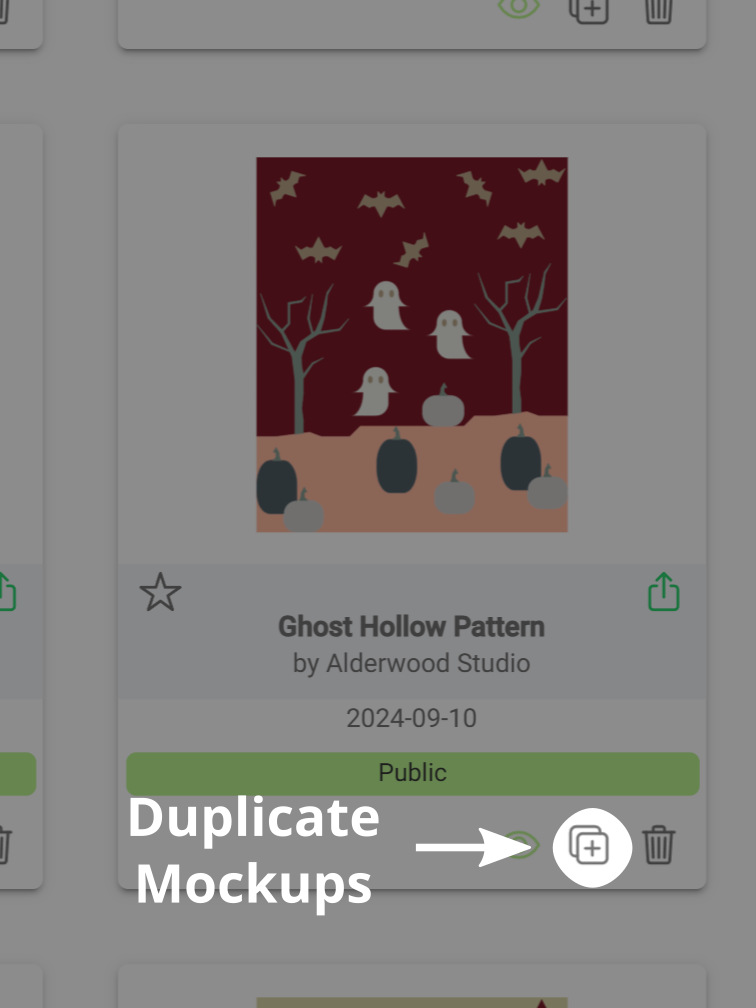
6. Locate the duplicated mock/up in the Drafts tap.
7. Clikc the Palette icon to color it and create a different version..
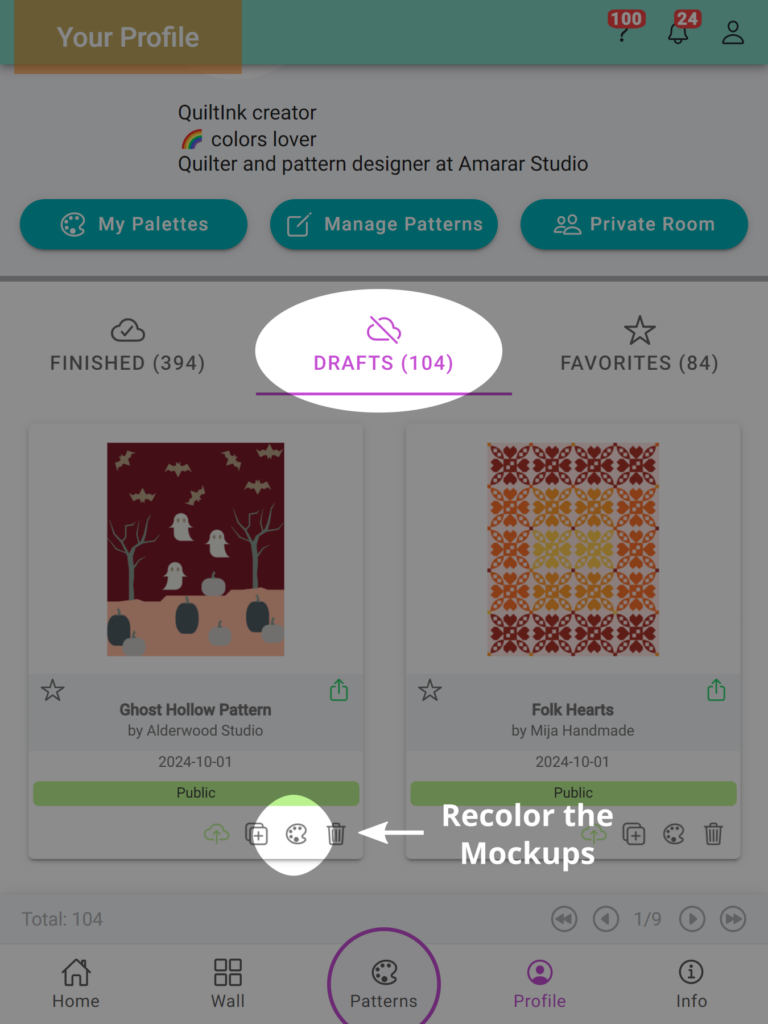
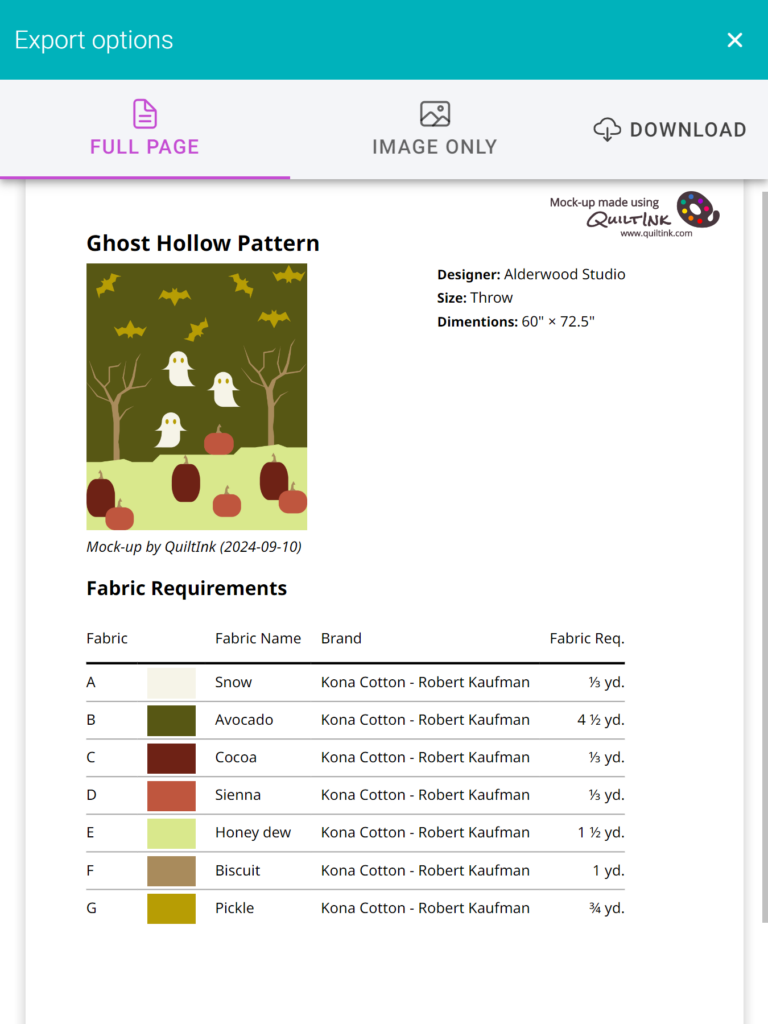
8. Check the FQ are there.
9. Download the sheet with the list of fabrics and fabric requirements and save!
If you have any questions or concerns about the fabric requirements or any other aspect of using QuiltInk, we’re here to assist you. Feel free to reach out to us via email at info@quiltink.com or through the chat on our Instagram platform (@quilt_ink). We’re always happy to help ensure your experience with QuiltInk is smooth and productive.
